Appendix D: Working with Connector ID Keys on IGEL Thin Clients
Updated Installation Instructions
Due to improvements with the integration of IGEL Thin Clients with the Liquidware Connector ID Keys, these updated installation instructions are much simpler and easier to implement than the legacy ones. To install the CID Key on your IGEL Thin Clients, complete the following steps:
- In IGEL, go to Accessories > Connector ID Key Software.
- Select the Enable Stratusphere UX CID Key checkbox in the right panel.
- In the Stratusphere hub field, enter the hub IP-address or DNS of the Stratusphere.
- In the Stratusphere machine group field, enter the machine group of the Stratusphere.
- In the Stratusphere user group field, enter the user group of the Stratusphere.
- Click Ok to finish.
Legacy Installation Instructions
Important: You should only use the following installation instructions if you have an older version of the thin client or if you want to run a version of the Liquidware product that is not available on the thin client itself. In all other cases, use the updated installation instructions at the start of this section.
To install the CID Key on your IGEL Thin Clients using IGEL Universal Management Suite (UMS) Console, complete the following steps:
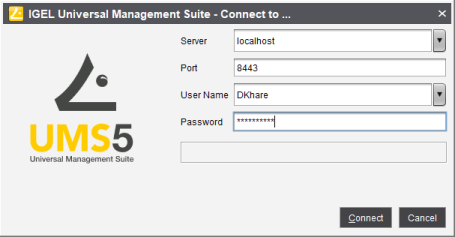
- Log in to your machine where you have the UMS Console as an administrator.
- Using your local browser, log in to the Administration section of the Liquidware Stratusphere Hub.
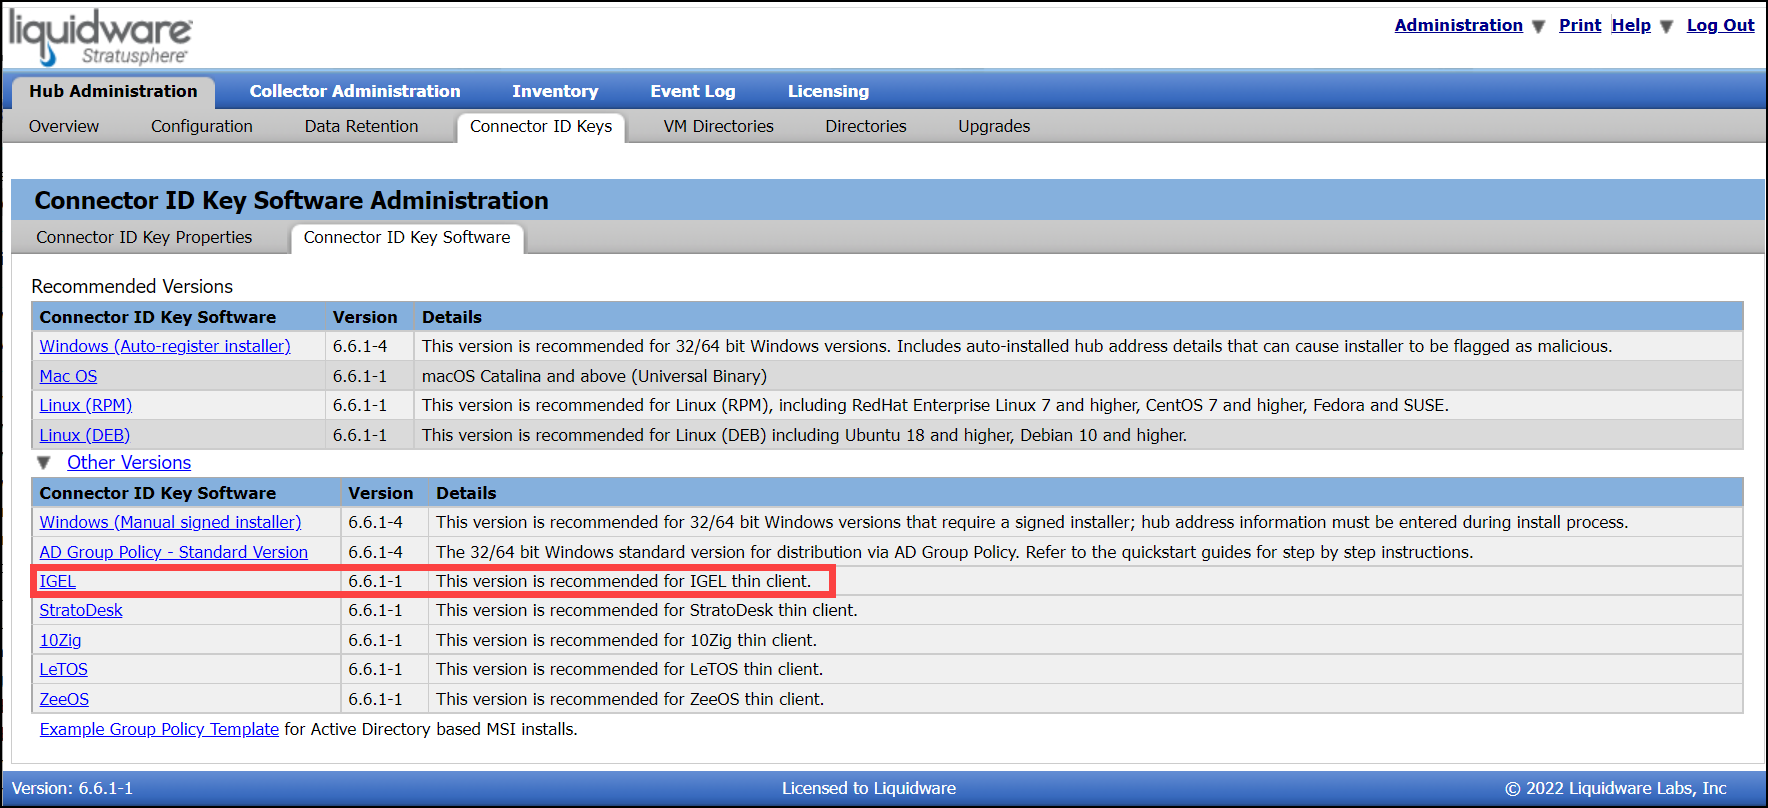
- Navigate to the Hub Administration > Connector ID Keys > Connector ID Key Software tab and expand the Other versions section under the main download table. Use the IGEL link to download the IGEL ZIP from the Hub onto your local UMS machine.
-
-
Navigate to the following location and create a new folder
lwlunder it:C:\Program Files (x86)\IGEL\RemoteManager\rmguiserver\webapps\ums_filetransfer\
After you unzip the contents of the ZIP file into the newlwlfolder, you should see three files:disclaimer.txtlwl.inflwl.tar.bz2
- Check the accessibility of the files by opening the INF file in your local browser using the following URL:
http://[ums_server]:9080/ums_filetransfer/[name]/[name].inf-
Note: Keep this URL available as it will be needed in the step below.
- Log in to your UMS Console using your administrative credentials.
-
- In the left pane, navigate to your Server - <IP Address>, and expand IGEL Universal Management Suite 5 > Profiles.
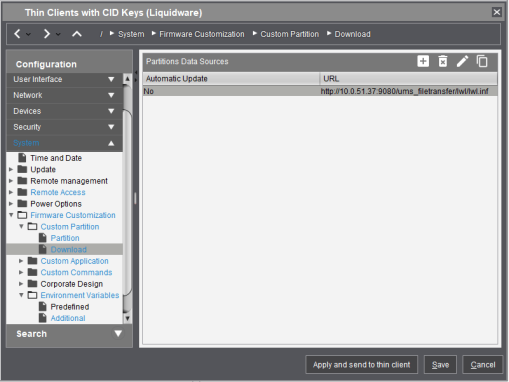
- Select an existing profile or make a copy of this existing profile to use as a starting point for installing the Stratusphere CID Key on your IGEL Thin Clients. In this example, the profile is Thin Clients with CID Keys (Liquidware).
-

- Right-click the Thin Clients with CID Keys (Liquidware) profile and select the Edit Configuration option.
- In the left column of the window that pops up, navigate to Configuration > System > Firmware Customization. Within this section, we are going to work with the Custom Partition, Custom Commands, and Environment Variables sections to customize the CID Key installation.
- Expand the Custom Partition section and click the Partition link.
- In the right panel, select the Enable Partition checkbox.
- Set the size to
200MB. - Use the default Mount Point, which should be set to
/custom. - Click Save.
- Return to the Custom Partition section and click the Download link.
- In the right panel, click the + button to add a new Partitions Data Sources entry. In the URL field, copy and paste the URL that you tested in Step 5 above.
- In the Username and Password fields, enter your credentials for UMS.
- In the Initializing Action field, enter
sh /custom/init-lwl.sh. - Click OK.
- The new entry for Partitions Data Sources should be visible in the right panel. Click Save.
-
- In the left column, navigate to the Configuration > System > Firmware Customization > Custom Commands section and click the Network option.
- In the right panel, enter the following in the After network DNS field:
/opt/vdesktools/bin/vs-helper -c /opt/vdesktools/grd/grd.conf- Click Save.
- Click the Apply and send to thin client button to apply this profile to the thin clients within the selected Profile. You can also assign this profile to other thin clients. The system then reboots.
- Log in to any of the thin clients within the applied profile to verify that the CID Key software is up and running by opening a terminal window and running the following command:
ps -ef | grep vs- The command lists all processes running on the machine, filtered by any process with
vsin the process name, as shown in the image below. -

- If you see
/opt/vdesktools/bin/vs-helperdisplayed on your screen, this is confirmation that the CID Key is running.