The update process starts with downloading and installing software updates for the ProfileUnity Management Console from the Console, itself, if it is connected to the internet, or from the Liquidware website. After the upgrade completes, the other related software components are also upgraded. The update process is also a good time to review your license and update it if necessary. We also suggest reviewing the release notes to see if there are recent changes to existing templates. You can also use the Guided Configuration Wizard to find changes: just deploy from one of the new templates and compare it to your existing configuration to find areas in which you might want to make changes.
Preparation
The ProfileUnity Management Console update process is designed to preserve your existing database and configuration settings. However, we recommend that you make a backup copy of your database and the ProfileUnity Management Console before starting the update process in case you encounter any unforeseen interruptions and need to revert back to the original copy.
- Open the ProfileUnity Management Console.
- Hover over your username in the top right corner of the screen.
- In the drop-down menu that appears, click the Administration option.
- Scroll down to the Database section.
- Click the Backup Databases button to create a backup of the ProfileUnity database. When the process is finished, download the backup for safe keeping.
- Shut down and snapshot the ProfileUnity Management Console virtual machine.
Download the Installer from the Console
- Open the ProfileUnity Management Console.
- Hover over your username in the top right corner of the screen.
- In the drop-down menu that appears, click About.
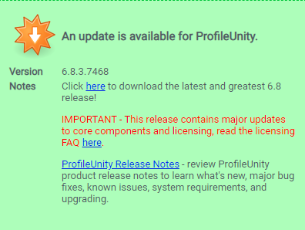
- The About ProfileUnity screen appears, displaying the version number you are currently running. If an update is available, a special message box appears. The box displays the version number for the update along with a link to download it. Click the link to start the download.
-
- Run the installer and follow the directions to update your ProfileUnity software.
Download the Installer from the Liquidware Website
- Go to the Download screen of the Liquidware website, located at:
https://www.liquidware.com/download. - Either log in to the Customer Download Portal or fill out and submit the Evaluation Download form.
- On the Download page that opens, select and download the ProfileUnity Installer that you need for your environment.
- Run the installer and follow the directions to update your ProfileUnity software.
Running the Installer
The ProfileUnity standalone installer upgrades the ProfileUnity Management Console and downloads the updated software for the ProfileUnity FlexApp Packaging Console and the ProfileUnity Client.
Important: The ProfileUnity Management Console requires your user account to have administrative privileges on the local machine for installation.
To run the installer, complete the following steps:
- Browse to
ProfileUnity-Net_X.X.X.exeand click the ProfileUnity standalone installer to begin the upgrade. - After the installer loads, the setup wizard for ProfileUnity appears. Click Next.
- Enter the folder on your local machine where you have the Management Console installed, then click Next.
- The License Agreement appears on the screen.
- Read the agreement and select the “I accept…” option, then click Next.
- The installer detects this is an upgrade with an existing database and fabric. Click Next.
- ProfileUnity is now ready to install.
- Click Install to upgrade the software or Back to change any of your installation settings.
- The setup wizard begins upgrading your files.
- After the upgrade completes, click Finish.