The Stratusphere Hub, Database, and Collector appliances can also be installed easily on Amazon Web Services (AWS) using Amazon Machine Image (AMI) names available in each data center within AWS. The Stratusphere Hub appliance is available as a Bring Your Own License (BYOL) and an Hourly Metered Marketplace appliance. Depending on your licensing and usage scenarios, you can select any one of these types of appliances.
The Stratusphere Hub appliance is the data collector and reporting system for diagnostics and it also includes the data collection software agents that is deployed within the machines. The Stratusphere Database appliance is a dedicated database appliance for higher performance and scale for larger installations. The Stratusphere Collector appliance is a dedicated data collector appliance that is used to offload this load from the Hub appliance. Use the Stratusphere Sizing Guide to determine resource sizing guidelines for the Hub and CID Collector appliances. The first step is to install the Hub appliance and, if the sizer states based on your configuration, install the Database and Collector appliances as well. Because these virtual appliances are basically server appliances with a web front end, data collection and storage, and reporting appliance, it is recommended that you deploy them on AWS Instance Tiers appropriate for high performance server applications.
The following high-level instructions are meant to install the Stratusphere Appliances within your AWS data center location within your Virtual Private Circuit (VPC).
- Use the Stratusphere Sizing Guide to get recommendations on all the appliances required or recommended along with sizing for CPUs, RAM, and Disk IOPs and Storage.
- Install the Stratusphere Hub instance.
- Turn off or stop the instance.
- Use the AWS Portal to properly size the disks as recommended by the Sizing Guide.
- Turn on or start the instance again.
- If needed, install the Stratusphere Database instance.
- Turn off or stop the instance.
- Use the AWS Portal to properly size the disks as recommended by the Sizing Guide.
- Turn on or start the instance again.
- Establish trust between the Hub and the Database instance.
- Join the Hub and the Database instance.
- If needed, install the Stratusphere CID Key Collector instance.
- Add and register the CID Key Collector to the Stratusphere Hub instance.
Note: Because the instructions for the Hub, Database, and Collectors are the same, use the appropriate AMIs and note the differences in AWS Instance Types, models, and resource requirements regarding vCPUs, RAM, number of disks, and disk space required between the Hub, Database, and Collector appliances.
Stratusphere BYOL & Hourly Metered Marketplace Hub Appliances
Liquidware provides BYOL and Hourly Metered Marketplace Hub appliances. If you already have a perpetual Stratusphere license, you can use it to migrate your data from your on-premises installation into AWS. Contact Liquidware to migrate the license to the new Stratusphere Hub appliance when you need to apply the new BYOL license to this new Hub in the cloud. If you chose to use the Hourly Metered Stratusphere Hub, you can simply subscribe to it using AWS subscription. AWS will charge you as part of your standard billing cycle based on a User per Hour charging model. The Stratusphere Database and Collector appliances are only available as public AMIs in each region. They can be used with the BYOL or Hourly Metered Hub appliances.
Preparation
- Acquire administrative credentials to the Amazon Web Services EC2 environment for your organization.
- Use the Liquidware Stratusphere Sizing Guide to appropriately size the Stratusphere Hub and Collector appliance for your installation base.
Instructions
- Refer to the Liquidware Product Download page for the most up-to-date Stratusphere Hub, Database, and Collector AMIs for your data center.
- Log in to your Amazon Web Services EC2 site using your administrative credentials.
- Select the appropriate Data Center Location on the top right of the screen, then click the EC2 link to manage all your virtual machines in the cloud.
-

- Click the Instances link in the left column.
-
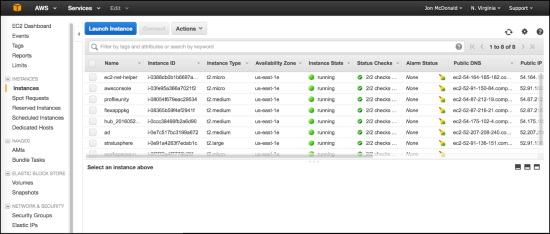
- To create a new virtual machine without selecting any existing machine, click the Launch Instance button.
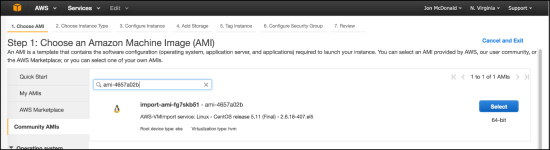
- As part of this wizard, on the Step 1: Choose an Amazon Machine Image (AMI) page, select Community AMIs or AWS Marketplace in the left column.
- Search for the AMI ID (Hub, Database, or Collector) for your region and select it.
- Click Select to proceed.
-
- On the Step 2: Choose an Instance Type page, for the Hub, the recommendation is to select the m4.xlarge instance for starters. Depending on the Stratusphere Sizing Guide, select the appropriate model with an adequate number of vCPUs and RAM.
-
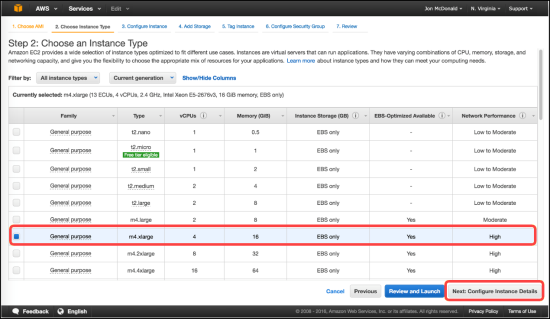
- Click the Next: Configure Instance Details button.
- The following chart shows which Amazon EC2 Instance Types and minimum model sizes are supported to run Stratusphere UX Hub appliances. Choose one of these Instance Types using the minimum model size or higher as needed to accommodate the CPU and RAM requirements calculated by the Stratusphere Sizing Guide.
-
Instance Type Description Minimum Model Recommended Supported Tested M4 General Purpose xlarge Yes Yes Yes M5 General Purpose xlarge Yes Yes Yes M5a General Purpose xlarge Yes Yes Yes M5d General Purpose xlarge Yes Yes Yes T3 General Purpose xlarge Yes Yes Yes - The Stratusphere Collector appliances on AWS require 2 vCPUs and at least 4 GB of RAM. Liquidware recommends using the m4.large model for Collector appliances that have 2 vCPUs and 8 GB of RAM. Set the disk space requirements as per the Sizing Guide mentioned above.
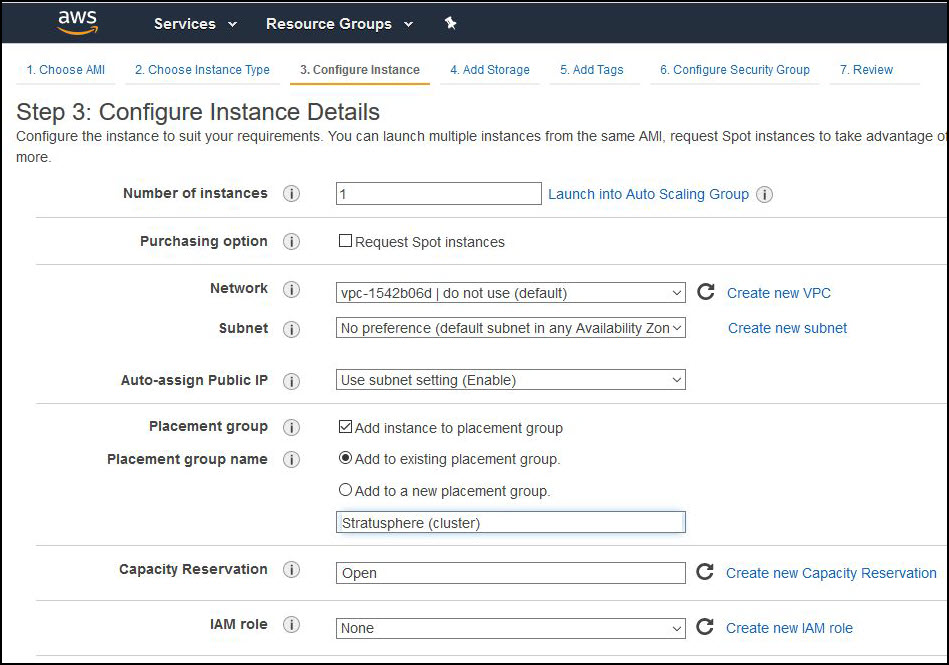
- On the Step 3: Configure Instance Details page, enter
1in the Number of instances field, then select the appropriate Network VPC. -
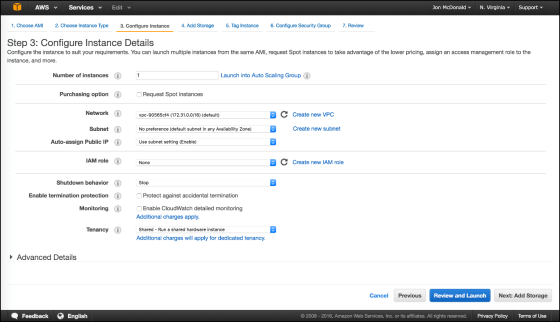
- Click the Next: Add Storage button.
- If you are installing multiple Stratusphere appliances, such as a Hub and a Database or a Collector, AWS provides Placement Groups to enhance network connectivity and reduce latency between the Stratusphere appliances. Liquidware recommends creating a Cluster-based Placement Group and adding each Stratusphere appliance to this Placement Group during configuration itself. The following is an example with an appropriately named Stratusphere Placement group:
-
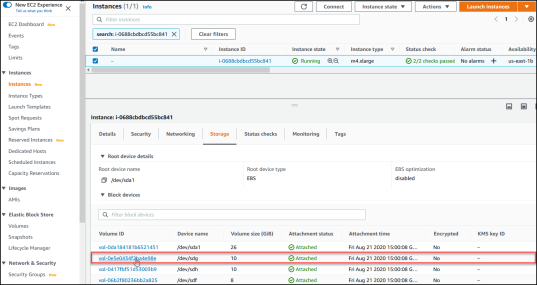
- On the Step 4: Add Storage page, enter the appropriate hard disk sizing details based on Stratusphere Sizing Guide recommendations, an example of which is shown below. Note that the AWS storage devices might not be listed in alphabetical order. Make sure the AWS label matches the Sizing Guide. For example, “/dev/sdh” is “HD 3”, which is to be used for database storage.
- Click the Next: Tag Instance button to continue.
- On the Step 5: Tag Instance page, enter Stratusphere or Hub or CIDCollector or a similar value for the Key, Value pair to tag the virtual appliance properly.
- Click the Next: Configure Security Group button to proceed.
- On the Step 6: Configure Security Group page, select or create an appropriate security group that would allow traffic to the Stratusphere Hub appliance. For convenience, you could create a sample security group that allows All Internal Traffic to this appliance for now, and then come back later to allow only the protocols and ports that are required for the Stratusphere Hub appliance.
-
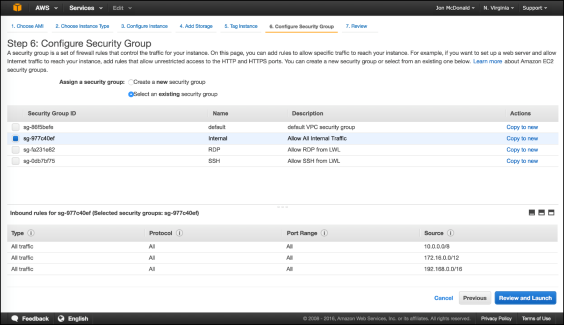
- Click the Review and Launch button to proceed.
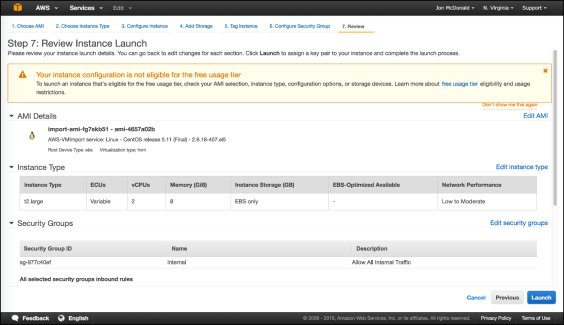
- On the Step 7: Review Instance Launch page, review and verify the selection of the right AMI, all the Instance settings, and the Security Group configurations. After you have validated them , click the Launch button to create, install, configure, and launch the Stratusphere Hub or Collector Appliance.
-
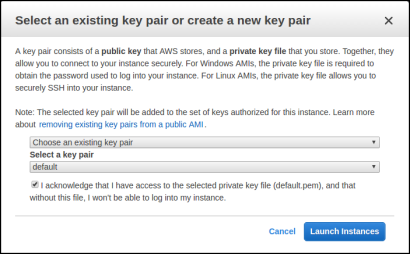
- Amazon recommends using key pairs to access AMIs. Make a selection from the options provided.
-
- The AWS EC2 UI then returns to the list of your AMIs. It shows the Stratusphere appliance being prepared with a State showing pending. When it is finished, the state changes to running . The Instance Status column displays Initializing… for some time and then performs some checks to show Check 2/2. The entire import, install, and configuration process should take about 10-15 minutes after launch time. It needs some time to perform some startup configuration tasks before it is ready for use.
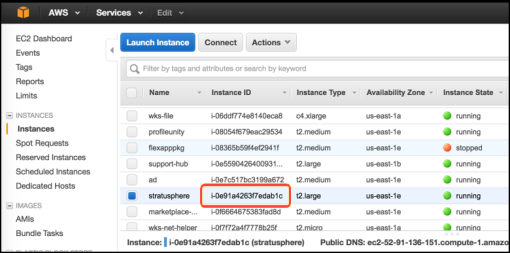
- Note the Local IP address, DNS Name, and host name for the appliance. For a Hub appliance, use the Local IP address of the appliance displayed in the bottom half of the AWS UI and use your preferred browser to navigate to the following address:
https://<enter.hub.ip.address>. - While following the instructions in the standard documentation that follows, note the following differences:
- AWS does not allow default passwords for appliances i.e. sspassword. So anywhere you see sspassword replace it with the Instance ID of the virtual machine as seen on the EC2 page for the details of the Hub appliance. This applies to the default ssadmin user on the Web UI of Stratusphere Hub.
- If using SSH Key Pairs to connect to a Stratusphere appliance on AWS, Liquidware strongly recommends using Microsoft Windows 10 Command Prompt as the SSH client using the following command:
ssh -i <path-to-key-pair-file.pem> ec2-user@<aws-ip.or.dns>- Liquidware recommends using SSH key pairs associated with the automatically created AWS User ID: ec2-user. If you want to switch to root user while logged into the console for Stratusphere Hub, you should use sudo <command> to execute commands that require elevated permissions.
- Use the standard documentation to now log in to the Hub Web UI and configure the appliance.
- Before beginning to use Stratusphere appliances in production, remember to use the Liquidware Stratusphere Sizing Guide to appropriately size the Stratusphere Hub appliance and Collector appliance for your installation base. More information can be found in the next section, Expanding Disk Space on Stratusphere Appliances on AWS.
- After installing the Hub, repeat these same instructions to install the Database and Collector appliances. After installation is complete, refer to the instructions from a later section of this guide, Establish Trust between Stratusphere Hub & Database, before using the standard process of joining them together, as well as how to add and register Collector appliances to the Stratusphere Hub.
Expanding Disk Space on Stratusphere Appliances on AWS
Amazon Web Services Stratusphere appliances are created with default disk sizes. Liquidware strongly recommends using the Stratusphere Sizing Guide to properly size CPU, RAM, Disk IOPs, and Storage for its appliances. The following instructions explain how to expand the size of a database disk on a Stratusphere Database instance on AWS. The same process can be followed for expanding the disk size on the Stratusphere Hub instance as well.
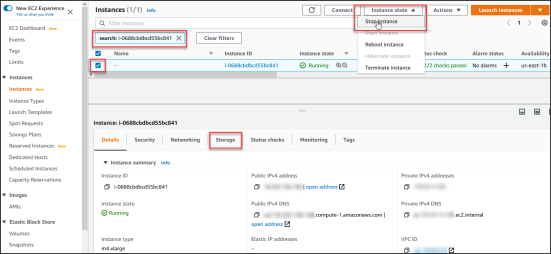
- Within the AWS EC2 Dashboard, navigate to Instances and search for your Stratusphere appliance instance ID. Select the checkbox next to the instance and click the Instance state > Stop Instance button to stop the appliance. Wait until the UI updates the status of the appliance to being Stopped. Then click the Storage tab on the bottom panel.
-
- On the Storage tab, click into the Volume ID of the disk that you need to expand as per the Stratusphere Sizing Guide recommendation.
-
- On the specific Volume ID page, select the volume and click the Actions > Modify Volume option.
-

- In the Modify Volumes window, enter the new size of the disk recommended by the Stratusphere Sizing Guide and click the Modify button to save.
-

- Follow the same process to expand any other disks as recommended by the Stratusphere Sizing Guide.
- After all disks are expanded, navigate back to the main page of the Stratusphere appliance instance, and click the Instance action > Start Instance button. After the instance is running, it auto-expands the disks to the newly set storage size.
- Repeat these instructions for the Hub and/or Database as recommended by the Stratusphere Sizing Guide.
Establish Trust Between Stratusphere Hub and Database
AWS does not allow the use of standard passwords to log in to appliance consoles. As documented above, SSH keys must be set up to establish trust between appliances before the join can be performed. For the join to work, the following must be true:
- The ec2-user on the Hub must be able to SSH without a password to the ec2-user on the Database, and
- The root user on the Hub must be able to SSH without a password to the ec2-user on the Database for upgrade purposes.
- The root user on the Database must be able to SSH without a password to the ec2-user on the both the Hub and Database appliances.
-
Note: Each of the three steps list above is expanded upon in much greater detail in the table of instructions later in this section.
Preparation
The following is a list of items to prepare and instructions to establish trust between these appliances before you can use the standard join process.
- Ensure the security policy of each appliance allows SSH connections between the Hub and Database.
- Ensure the security policy of the Hub appliance allows connections to the Database appliance on port TCP/5432.
- Download and install an SSH client on your computer prior to beginning the process below. Liquidware strongly recommends using Microsoft Windows 10 Command Prompt as the SSH client. If you prefer to use PuTTY, refer to the article entitled Convert Pem to Ppk File Using PuTTYgen to convert your AWS PEM-based key pair to a format compatible with PuTTY and then connect using key pairs within PuTTy.
Preliminary Notes
In some commands below, <paste-key> is a placeholder for the action of pasting information from the clipboard.
If using Microsoft Windows 10 Command Prompt as your SSH client, this action involves going to the Command Prompt window’s top left menu option and selecting Edit > Paste to paste the contents of the clipboard into the command line. While logged into an SSH session, common keyboard commands such as CTRL + C for copy and CTRL + V for paste do not work. In these cases, use the Enter key to copy and the window’s top left menu option, Edit > Paste, to paste.
If using PuTTY as your SSH client, selecting the text with a mouse copies the selection to the clipboard and right-clicking the mouse pastes the contents of the clipboard.
When entering commands, characters such as < and > and the text, paste-key, should NOT be entered on the command line. The text paste-key merely refers to the action that should be taken at that point in the command line.
Instructions
| # | Hub Instructions | Database Instructions |
|---|---|---|
| 1 | Using a tool like Microsoft Windows 10 Command Prompt, open two SSH connections to each appliance and place them side by side using the following command:
ssh -i <path-to-key-pair-file.pem> ec2-user@<aws-ip.or.dns
Connect to the Stratusphere appliance consoles using the standard ec2-user with the associated AWS keys. For details on how to do this, refer to the AWS documentation. |
|
|
|
The following steps address point (A) above | |
| 2 |
Within the SSH console of the Hub appliance, while logged in as ec2-user, generate a new SSH key by executing the following command and accepting the defaults by pressing Enter:
DO NOT enter a passphrase if prompted by the keygen command. Leave the field empty. |
|
|
|
The console displays the following:
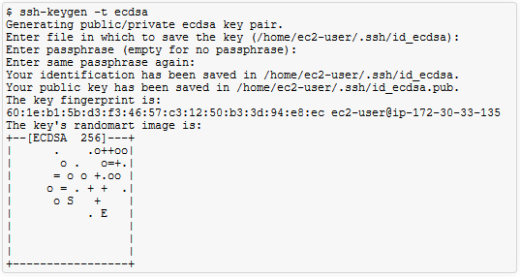
|
|
| 3 |
Within the same SSH console of the Hub appliance, print the contents of the SSH public key by executing the following command, and then use your mouse to select the public key that appears and then copy it to your clipboard:
|
|
|
|

If you are using the Microsoft Windows 10 Command Prompt, select the entire key with your mouse and then click Enter to copy it to your clipboard. If using PuTTY, merely selecting the key with your mouse copies it to your clipboard. |
|
| 4 |
|
Switch to the SSH console on the Database appliance, and add the Hub’s ec2-user public key to the authorized list of keys that can connect as the ec2-user by using the echo command and pasting the key copied from above, and sending it to the authorized_keys file:
echo "<paste-key>" >> .ssh/authorized_keys
If you are using Microsoft Windows 10 Command Prompt, click the Command Prompt window’s top left menu option Edit > Paste to paste the key. If using PuTTY, then simply right-click your mouse to paste the key. |
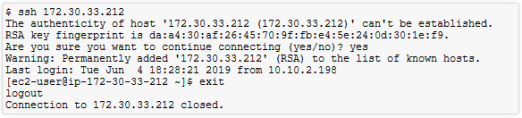
| 5 | From within the SSH console on the Hub appliance, verify whether the Hub can connect without a password to the Database as the ec2-user.
ssh <db.ip.or.dns> Accept the SSH keys by typing yes. You are now logged in to the database appliance. You can log out by typing the exit command:exit You are then logged out of the database appliance and the connection is closed, as shown below. |
|
|
|
|
|
|
|
The following steps address point (B) above |
|
| 6 |
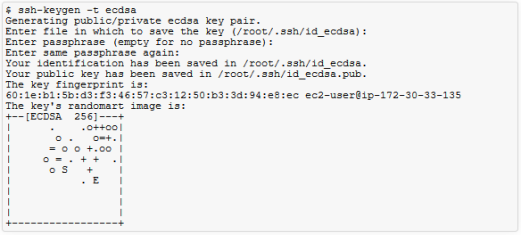
Now that you have confirmation for ec2-user, you need to run through the same process for the root user. Within the SSH console on the Hub, switch to root and generate a new SSH key. Press Enter to accept the defaults:
sudo bash ssh-keygen -t ecdsa -q -N ""
DO NOT enter a passphrase if prompted by the keygen command. Leave the field empty. |
|
|
|
|
|
| 7 |
Within the same SSH console of the Hub appliance, print the contents of the SSH public key by executing the following command. Then use your mouse to select the entire sequence of characters displayed, which forms the public key, to copy it to your clipboard:
cat /root/.ssh/id_ecdsa.pub |
|
|
|
If you are using Microsoft Windows 10 Command Prompt, select the entire key with your mouse and then press Enter to copy it to your clipboard. If using PuTTY, merely selecting the key with your mouse copies it to your clipboard. |
|
| 8 |
|
Switch to the SSH console on the Database appliance, and add the Hub’s root user public key to the authorized list of keys that can connect as the ec2-user. To do this, use the echo command to paste the key copied from above and send it to the authorized_keys file:
echo "<paste-key>" >> .ssh/authorized_keys
If using Microsoft Windows 10 Command Prompt, click the Command Prompt window’s top left menu option Edit > Paste to paste the key. If using PuTTY, then simply right-click your mouse to paste the key. |
| 9 |
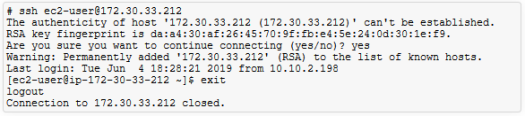
From within the SSH console on the Hub appliance, verify whether the Hub can connect without a password to the Database as the ec2-user.
ssh ec2-user@<db.ip.or.dns>
Accept the SSH keys by typing yes. You are then logged in to the database appliance as ec2-user. You can log out by typing the exit command:
exit
You are then logged out of the database appliance and the connection is closed, as shown below. |
|
|
|
|
|
| 10 |
From within the SSH console on the Hub appliance, log out as root to return to the ec2-user to prepare for the next set of commands below.
exit |
|
|
|
The following steps address point (C) above: |
|
| 11 |
|
Within the SSH console of the Database, switch to root user using the command:
sudo bash |
| 12 |
|
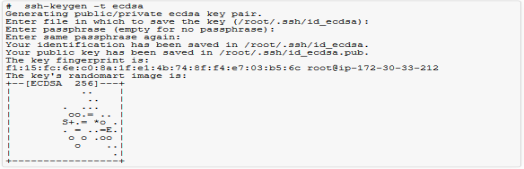
Within the same SSH console on the Database, generate a new SSH key as the root user by executing the following command and accepting the defaults by pressing Enter:
ssh-keygen -t ecdsa -q -N ""
DO NOT enter a passphrase if prompted by the keygen command. Leave the field empty. |
|
|
|
|
| 13 |
|
Within the same SSH console of the Database appliance, print the contents of the root user’s SSH public key. To do this, execute the following command, and then use your mouse to select the entire sequence of characters displayed, which forms the public key, to copy it to your clipboard:
cat /root/.ssh/id_ecdsa.pub |
|
|
If you are using Microsoft Windows 10 Command Prompt, select the entire key with your mouse and then press Enter to copy it to your clipboard. If using PuTTY, merely selecting the key with your mouse copies it to your clipboard. |
|
| 14 |
|
Within the same SSH console on the Database appliance, add the Database’s root user public key to the authorized list of keys that can connect as the ec2-user. To do this, use the echo command to paste the key copied from above and send it to the authorized_keys file:
echo "<paste-key>" >> /home/ec2-user/.ssh/authorized_keys
If using Microsoft Windows 10 Command Prompt, click the Command Prompt window’s top left menu option Edit > Paste to paste the key. If using PuTTY, then simply right-click your mouse to paste the key. |
| 15 |
From within the SSH console on the Hub appliance, add the Database’s root user public key to the authorized list of keys that can connect as the ec2-user. To do this, use the echo command and paste the key copied from above and send it to the authorized_keys file:
echo "<paste-key>" >> /home/ec2-user/.ssh/authorized_keys
If using Microsoft Windows 10 Command Prompt, click the Command Prompt window’s top left menu option Edit > Paste to paste the key. If using PuTTY, then simply right-click your mouse to paste the key. |
|
| 16 |
|
From within the SSH console of the Database, verify whether the root user of the Database can connect without a password to the Hub as the ec2-user.
ssh ec2-user@<hub.ip.or.dns>
Accept the SSH keys by typing yes. You are then logged in to the Hub appliance as ec2-user. You can log out by typing the exit command.
exit
You are then logged out of the Hub appliance and the connection is closed as shown below. |
|
|
|
|
| 17 |
|
From within the same SSH console of the Database, you must also verify whether the root user of the Database can connect to itself as the ec2-user user. Again, you will have to accept the SSH keys and then log out from the connection:
ssh ec2-user@localhost |
|
|
|
|
| 18 |
Now that the trust connections between the Hub and Database using the ec2-user and root user have been verified, you can proceed to the instructions provided in the Connecting the Hub and Database appliances section to formally join a Hub and Database together. |
|


Add and Register a Stratusphere CID Key Collector to the Hub
Note: If the Stratusphere Sizing Guide recommends adding a Database appliance, complete the establishment of trust and connecting the Hub and Database section above first before adding and registering a CID Key Collector to the Hub.
- After a Stratusphere CID Key Collector is up and running within your AWS EC2 VPC environment, log in to the Administration section of the Stratusphere Hub’s Web UI. Use the default credentials and the Instance ID as the password to log in.
- Navigate to the Collector Administration > Collectors tab.
- Click the New button to add a new Collector.
- On the Create Collector screen that opens, enter a host name as Name, DNS Name, and Local IP Address, using the same values shown on the AWS EC2 page for the Collector’s details.
-

- Click the Create Collector button to save and create a new Collector.
- The Hub will reach out to the Collector and help register it. After it is registered, the Collector might reboot, get the registration information from the Hub, and then show up as a CID Key Collector within the main Collector Administration > Collectors page.
- Repeat these instructions to add and register additional Collectors.