After the Hub import into the virtual host is complete, you can customize the Hub settings for your environment. In addition to other configuration options, you can edit the Hub's CPU/Memory settings. If you want to expand an existing disk or add a hard disk, refer to the Stratusphere Sizing Guide to calculate the required amount of space.
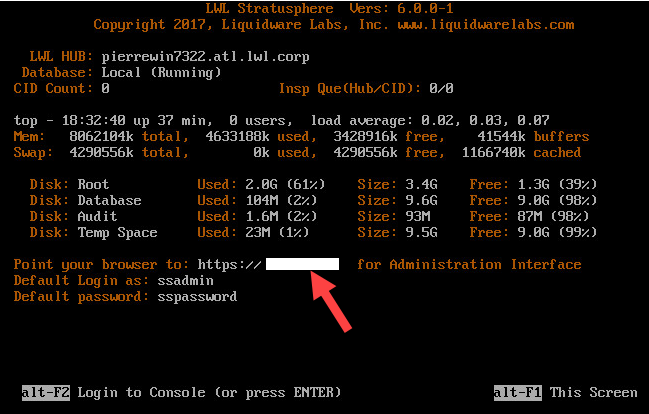
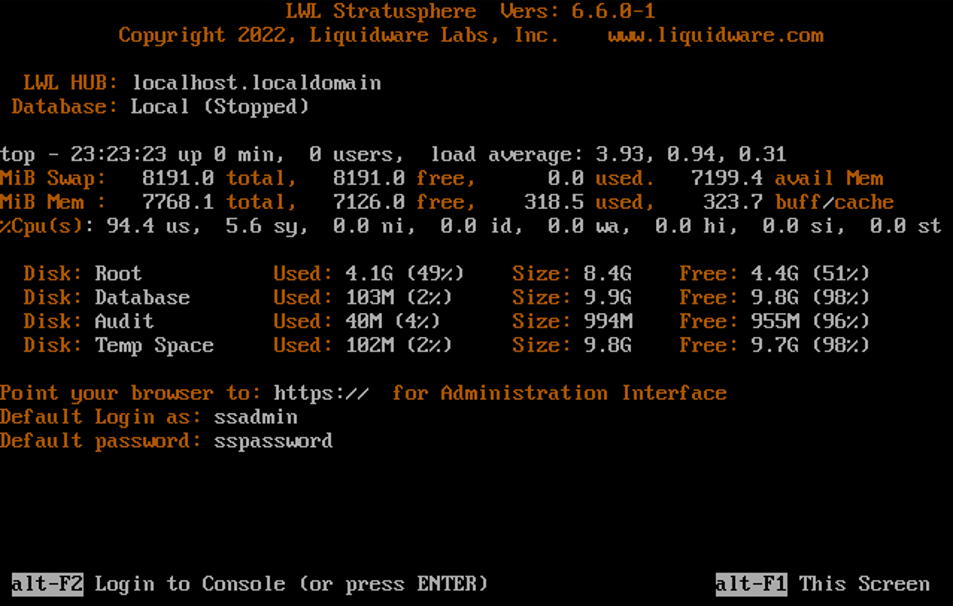
To get started with the configuration process, power on the virtual appliance and open a console to watch the boot sequence. After the Hub is booted, the console view looks like the image below. The Hub can be configured by either using the Web UI or the Console UI.

Using the Web UI
If Dynamic Host Configuration Protocol (DHCP) is enabled on the local network subnet, the Stratusphere Hub will acquire a DHCP network address. On completion of the boot sequence, the virtual appliance will provide a URL to connect to the web-based Administration Interface.
To configure the Stratusphere Hub using the Web UI, complete the following steps:
- Enter the Administration Interface URL found in the console view into a browser.
-
- At the web login screen, enter your Username and Password. The default Administration Interface credentials for the Stratusphere Hub web version are:
- Username:
ssadmin - Password:
sspassword -
Note: For AWS, use your VM Instance ID for the password.
- The License screen opens.
-
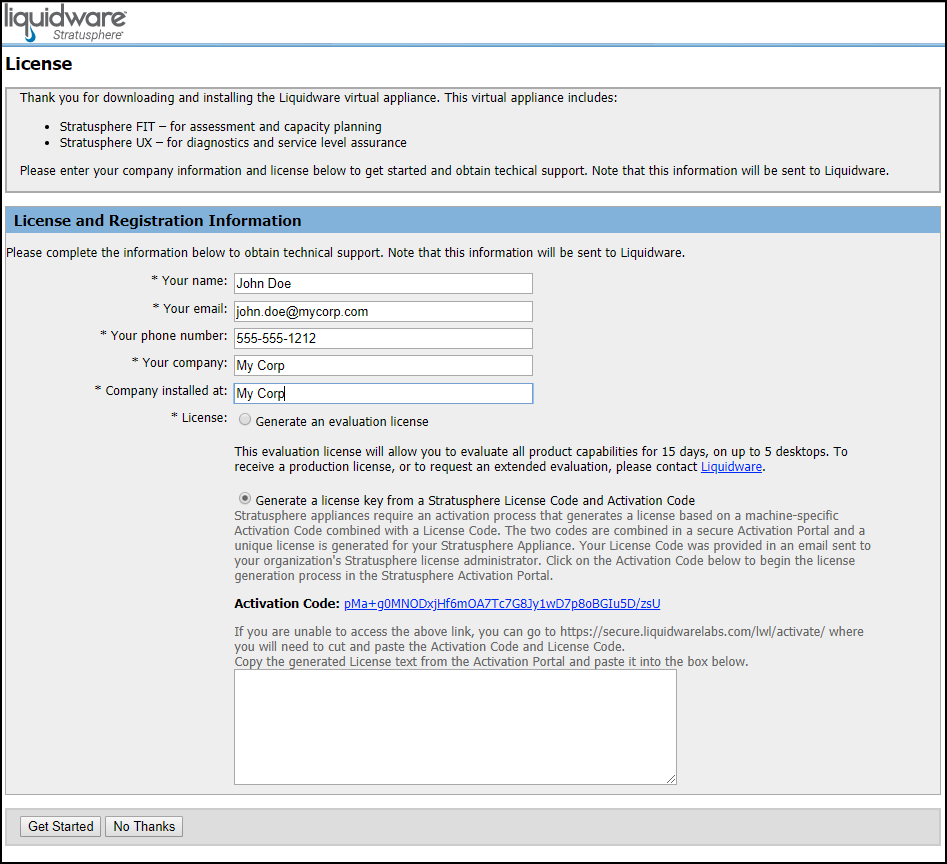
- In the License and Registration Information section, enter the required product registration information.
- In the License field, select one of the following radio button options:
- If you have not received a License Code and are evaluating the software, choose the Generate an evaluation license option, then jump to Step 6 below.
- If you have purchased the software and received a License Code, choose the Generate a license key from a Stratusphere License Code and Activation Code option. Then click the Activation Code link. This Activation Code is unique, and the link will take you to the Liquidware Stratusphere License Activation Portal where your Activation Code will be auto-filled for you.
-
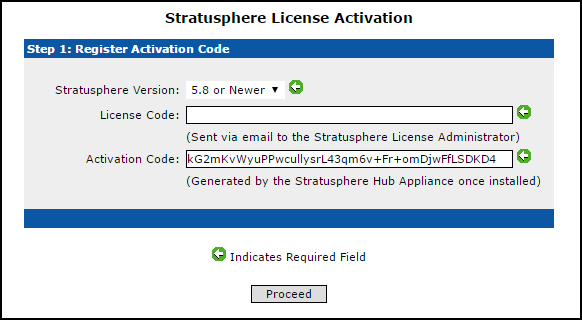
- Enter your unique License Code that was sent to you by email from Liquidware and click Proceed.
- Copy the generated License text from the Activation Portal and paste it into the box on the Update License tab in the Hub Administration module.
- Click the Get Started button to finish.
- Read through the End User License Agreement (EULA). If you agree to the terms, select the checkbox indicating that you have read all license agreements that apply to you, then click the I Agree button.
- The next step is to customize the Hub’s network configuration using the following fields in the Appliance Network Configuration, Security Settings, and Real-time Remediation Settings sections.
-
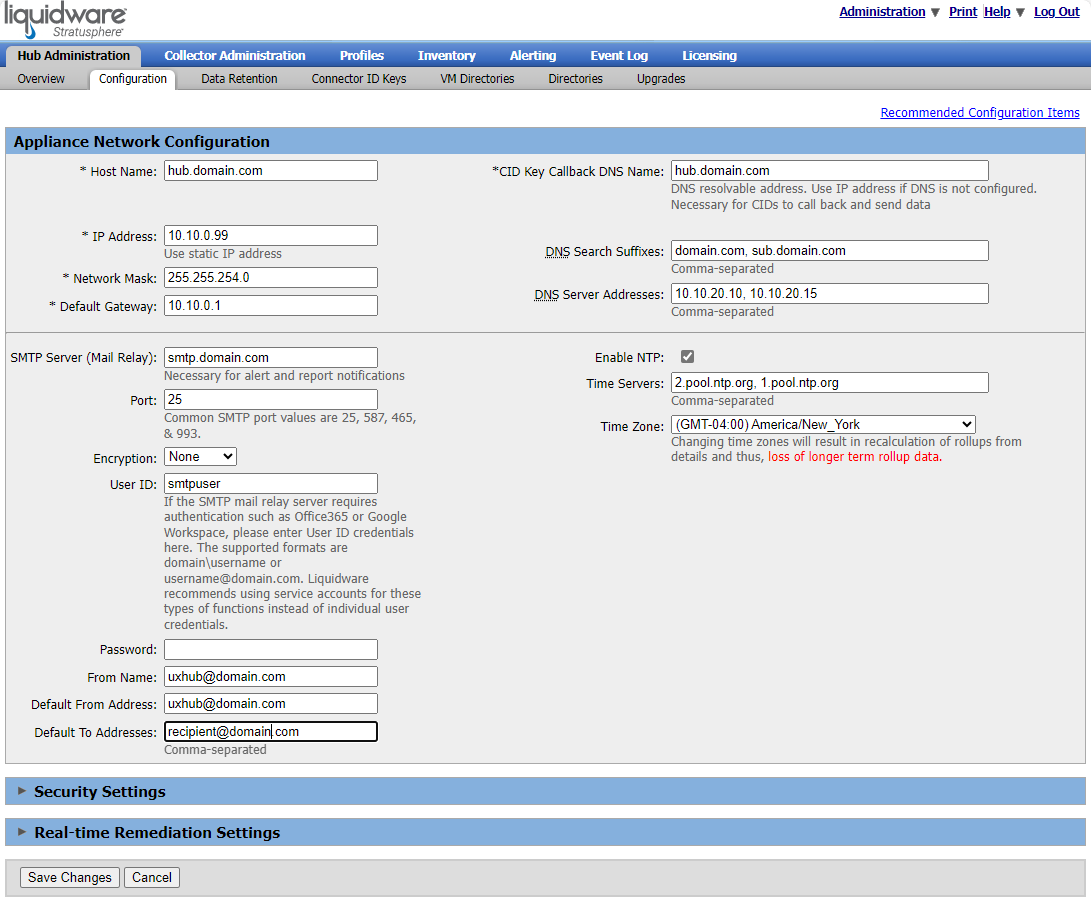
Appliance Network Configuration Fields
- Host Name: Enter a DNS resolvable fully qualified host name for the appliance. Underscores are not allowed.
- IP Address: Provide a static IP address for the virtual appliance. Because the appliance booted up using DHCP, it will potentially need to give up the same address unless it is reserved within the DHCP server. Changing it to a statically allocated IP address is strongly recommended.
- Network Mask: Enter the appropriate netmask for your network. Example:
255.255.255.0 - Default Gateway: Enter the default gateway for your network. Example:
10.10.2.1 - CID Key Callback DNS Name: Enter the fully qualified DNS entry name associated with this static IP address. The CID Keys will call back to the Stratusphere Hub based on the name you enter in this field. It is strongly recommended that you use a DNS Entry name here instead of IP address to circumvent any future issues that might crop up due to reconfiguring the IP address of the appliance.
- DNS Search Suffixes: Enter the local DNS search suffixes available within your local network.
- DNS Server Addresses: Enter 1 or more IP addresses of your DNS server in a comma-separated list.
- SMTP Server (Mail Relay): Enter the address of an SMTP mail relay server accessible from the Stratusphere Hub. Stratusphere Alerting uses this address to send SMTP-based email alerts.
- SMTP Port: Provide the port number that the Stratusphere Hub will send email alerts to. In most cases it should be the standard port for SMTP i.e.
25. However, if the SMTP Server is configured to listen on a custom port, alter the port number as required. - Encryption: Choose from None, TLS, or StartTLS.
- User ID: If the SMTP mail relay server requires authentication such as Office365 or Google Workspace, enter User ID credentials here. The supported formats are domain\username or username@domain.com. Liquidware recommends using service accounts for these types of functions instead of individual user credentials.
- Password: Enter the password for the SMTP mail relay server.
- From Name: Enter the name that Stratusphere email alerts will be from. In case there are multiple Hubs within your organization, this field should be customized with something like the FQDN of the Stratusphere Hub or an easy name to be associated with the email from this Hub. Otherwise, all emails from all Stratusphere Hubs will display the default "Stratusphere Hub Administrator" as the name in the email.
- Default From Address: Enter the default email address that Stratusphere email alerts will be from.
- Default To Addresses: Enter the default email addresses that Stratusphere email alerts will be sent to. This can be an administrator email, or an email alias used to send email to a group of people. If more than one email address is used, they should be separated by commas.
- Enable NTP: Enable this option to avoid time drift and keep the Stratusphere Hub’s time synched and accurate.
- Time Servers: This field is pre-populated with some public time servers. You can choose to enter your own comma-separated list of time servers as well, entered as IP addresses and/or DNS entry names.
- Time Zone: Select your local time zone from the drop-down list.
-
Note: Changing your time zone after Stratusphere has been in use collecting data will cause the recalculation of roll-up criteria used to display summary metrics and the loss of all previous roll-up data.
Security Settings
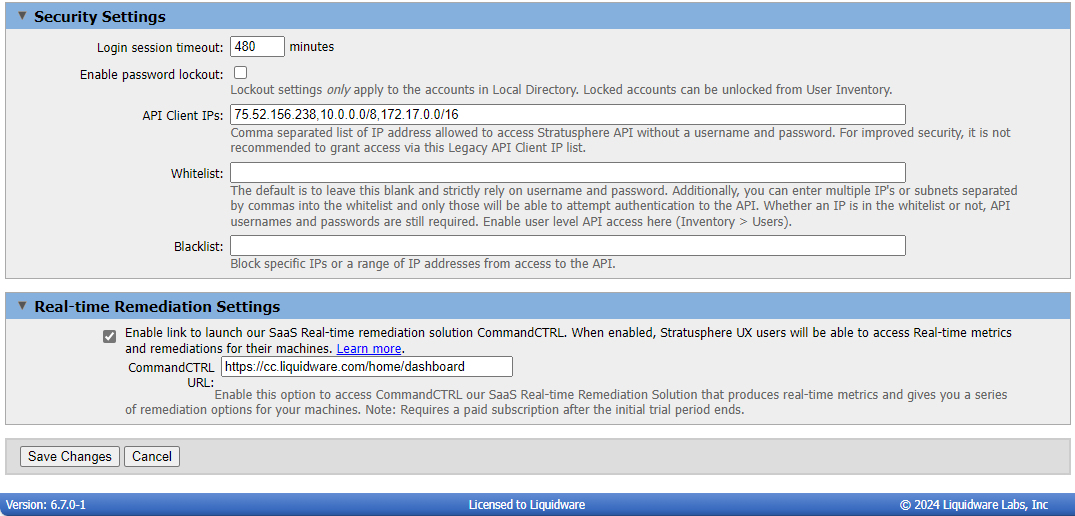
- Login session timeout: Based on your organizational security policies, enter the session timeout duration. If the user is inactive within the Stratusphere Web UI for more than the duration specified in this field, the user session is invalidated, and the user will have to re-authenticate and log back into the Web UI.
- Enable password lockout: Based on your organizational security policies, the password complexity and lockout policy can be enabled. Enabling this option ensures that passwords are complex and enforces the locking of accounts based on a certain number of invalid login attempts. This lockout setting applies only to Local Directory accounts. Locked accounts can be unlocked from the User Inventory.
- API Client IPs: Stratusphere provides a Database API to access and pull information out of the Stratusphere Database. Enter the specific IP addresses or subnets that can access information from the Stratusphere Database using the API without using a username or password. For improved security, it is not recommended to grant access via this Legacy API Client IP list.
- Whitelist: Enter the specific IP addresses that can access information from the Stratusphere Database using the API through user and password authentication. The default is to leave this field blank for wider access. If any IP addresses are listed, API access is restricted to only those IP addresses in the whitelist that can authenticate their identity. Liquidware enhanced security around Stratusphere API by disallowing usage of the default ssadmin user or any password that contains
passwordin it. Liquidware recommends creating a different set of users that are allowed API access using best practices around password security. - Blacklist: Enter the specific IP addresses that are blocked from having access to the Stratusphere Database using the API through user and password authentication.
Real-time Remediation Settings
- Enable link to launch our SaaS Real-time remediation solution, CommandCTRL: When enabled, Stratusphere UX users will be able to access Real-time metrics and remediations for their machine.
Note: Requires a paid subscription after the initial trial period ends.
- When you are done, click the Save Changes button to save your configuration settings. If you have configured the new Static IP address correctly, the browser redirects you to your new IP address-based URL.
Using the Console UI
If DHCP is not available on the local subnet, you can use the Console to configure the Stratusphere Hub appliance by completing the following steps:
- Open a console view of the Hub appliance in your virtual environment.
-
- Press Alt+F2 or Enter to log in to the console with your credentials.
- The default login credentials for the Hub Console are:
- Username:
ssconsole - Password:
sspassword
- Username:
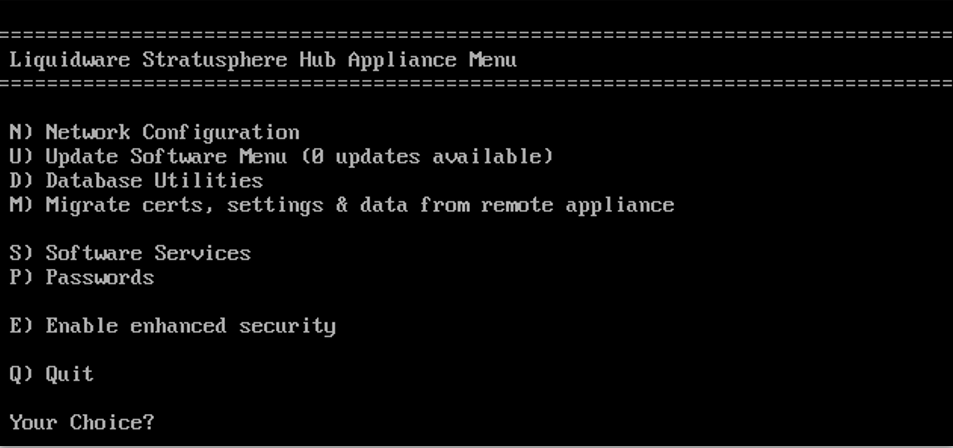
- After you have logged in, the LWL Hub console-based menu will be launched, as shown below. Type
Nto configure the Network, then press Enter. -
- The following screen appears, asking for information to configure the network appliance. Type
Yto change the configuration of the appliance. -
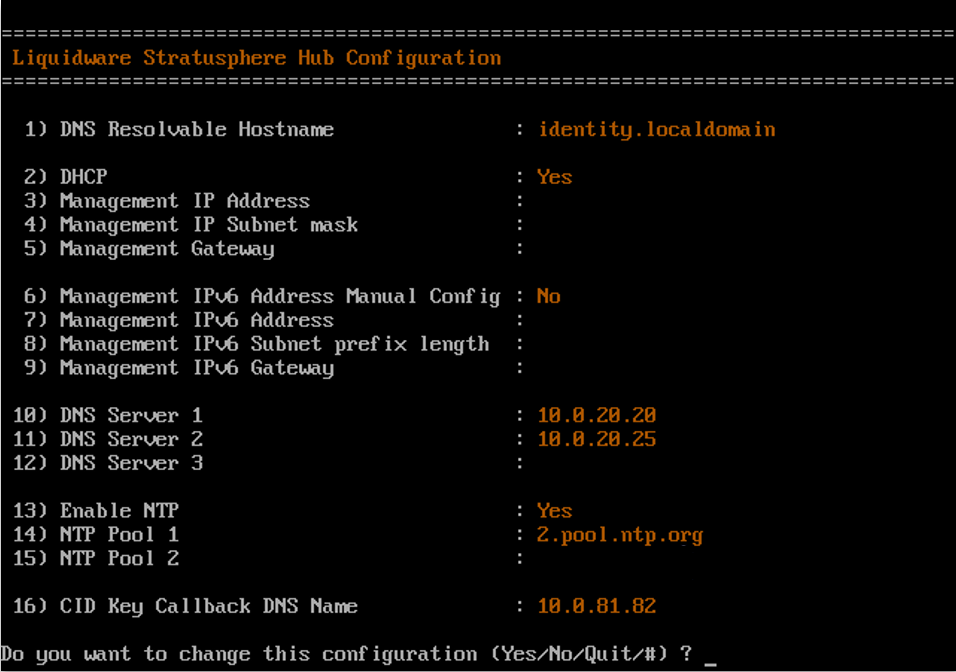
- Configure the appliance by providing the following information:
- DNS Resolvable Hostname: Enter an IP address or a host name that is a DNS Resolvable Fully Qualified Host Name.
- DHCP (N/Y): In most cases, enter
Nbecause you need a static IP address for this server. - Management IP Address: Enter the IP address for the appliance.
- Management IP Subnet Netmask: Enter the subnet mask for the IP address.
- Management Gateway: Enter the default gateway IP address.
- Management IPv6 Address Manual Config (N/Y): In most cases, enter
Nto automatically configure an IPv6 address. - Management IPv6 Address
- Management IPv6 Subnet Prefix Length
- Management IPv6 Gateway
- DNS Server 1: Enter the primary DNS server IP address.
- DNS Server 2: Enter the secondary DNS server IP address.
- DNS Server 3: Enter the tertiary DNS server IP address.
- Enable NTP (Y/N): Enter
Y. - NTP Pool 1: Enter the Primary NTP server IP address.
- NTP Pool 2: Enter the Secondary NTP server IP address.
- CID Key Callback DNS Name: Enter the DNS address that will be used by the CID Key to call back home to this Stratusphere appliance to register itself and upload its data. Make sure this address resolves to internal or external IP addresses that then map back to the Management IP Address.
- A confirmation screen then appears, displaying all of the values you just entered. If any item needs to be edited, enter the number of the item and the appliance will prompt you to edit it as needed.
- When you are satisfied with your configuration settings, type
Wto write and save these settings permanently. The appliance then applies and saves all of the configuration settings and takes you back to the initial menu options.