
The Windows agent runs natively on both x64 (amd64) and ARM64 hardware, including Snapdragon X Elite devices. ARM64 endpoints support all existing Windows agent features. On the Install Agent screen, choose the installer that matches the endpoint architecture.
Single Machine
Installing the Agent
The MSI installer allows for easy deployment using any software distribution solution like Microsoft End Point Manager or any other software distribution tools or solutions on the market. A command line for silent installation is also available under the install agent section. To install the CommandCTRL Agent on a single machine, complete the following steps:
-
Open CommandCTRL.
-
In the side navigation panel, scroll down to the Miscellaneous section and click the Install Agent button.
-
Search for the installation instructions for the Windows operating system.
-
In the Windows section, either:
-
If you want to interactively (not silent) install the MSI on a machine, click Download to save the MSI to your machine.
-
If you want to silently install the MSI on a machine, click Copy to copy the MSI link. For example, msiexec.exe /i "\\server\share\CommandCTRL.Agent.amd64-xx.x.xx.xxxx.msi" /qn TENANTID="xxxxxxxxxx" APIKEY="xxxxxxxxxxxxxxx". Install = /i and quiet = /qn.

-
Agent Updates
To enable or disable automatic updates, complete the following steps:
-
In the side navigation panel, go to Settings > Site.
-
In the Agent Settings section, the Enable/Disable switch located to the far right. The default is set to enable. It is recommended to accept automatic updates; however, this switch allows users the ability to control when the agent is updated.
-
Either leave the switch enabled or slide the switch to the left to disable the agent from automatically updating.
Updating the Agent
The MSI installer allows for easy deployment using any software distribution solution like Microsoft End Point Manager or any other software distribution tools or solutions on the market. A command line for silent installation is also available under the install agent section. To update the CommandCTRL Agent on a single machine, complete the following steps:
Note: If you already have the agent installed on a machine and you are updating the agent interactively (not silent), the Tenant ID and API Key fields will automatically populate in the Settings dialog box.
-
Open CommandCTRL.
-
In the side navigation panel, scroll down to the Miscellaneous section and click the Install Agent button.
-
Search for the update instructions for the Windows operating system.
-
In the Windows section, if you want to either:
-
Interactively (not silent) install the MSI on a machine, click Download to save the MSI to your machine.
-
Silently install the MSI on a machine, click Copy to copy the MSI link. For example, msiexec.exe /i "\\server\share\CommandCTRL.Agent.amd64-xx.x.xx.xxxx.msi" /qn TENANTID="xxxxxxxxxx" APIKEY="xxxxxxxxxxxxxxx". Install = /i and quiet = /qn.
-
Agent Updates
To enable or disable automatic updates, complete the following steps:
-
In the side navigation panel, go to Settings > Site.
-
In the Agent Settings section, the Enable/Disable switch located to the far right. The default is set to enable. It is recommended to accept automatic updates; however, this switch allows users the ability to control when the agent is updated.
-
Either leave the switch enabled or slide the switch to the left to disable the agent from automatically updating.
Uninstalling the Agent
CommandCTRL collects historical metrics for each machine. After the CommandCTRL Agent has been uninstalled from a machine, no additional metrics will be collected.
Uninstall Using the Command Line Method
To uninstall the CommandCTRL Agent from a single machine, follow the Windows procedure for removing an application.
Uninstall Using the CommandCTRL Method
To use CommandCTRL to remove an agent from a single machine, follow the same procedure in Uninstall the CommandCTRL Agent on Multiple Machines.
Multiple Machines
Installing the Agent
The MSI installer allows for easy deployment using any software distribution solution like Microsoft End Point Manager or any other software distribution tools or solutions on the market. A command line for silent installation is also available under the install agent section. To install the Agent on multiple machines simultaneously you would pick a method that allows for mass distribution like using the computer startup script method below. To accomplish this, complete the following steps:
-
Open CommandCTRL.
-
In the side navigation panel, scroll down to the Miscellaneous section and click the Install Agent button.
-
Search for the installation instructions for the Windows operating system.
-
In the Windows section, either:
-
If you want to interactively (not silent) install the MSI on multiple machines, click Download to save the MSI to your machine.
-
If you want to silently install the MSI on a machine, click Copy to copy the MSI link. For example, msiexec.exe /i "\\server\share\CommandCTRL.Agent.amd64-xx.x.xx.xxxx.msi" /qn TENANTID="xxxxxxxxxx" APIKEY="xxxxxxxxxxxxxxx". Install = /i and quiet = /qn.
-
-
After the MSI exists on the network, you can set this script to run at computer startup using the Group Policy Management Editor. Be sure the group policy object (GPO) exists in the computer organizational unit (OU) where you want the Agent to be installed. Go to:
Computer Configuration >Polices > Windows Settings > Scripts (Startup/Shutdown) > Startup - Add -
On the Add a Script screen that pops up, enter
cmd.exein the Script Name field.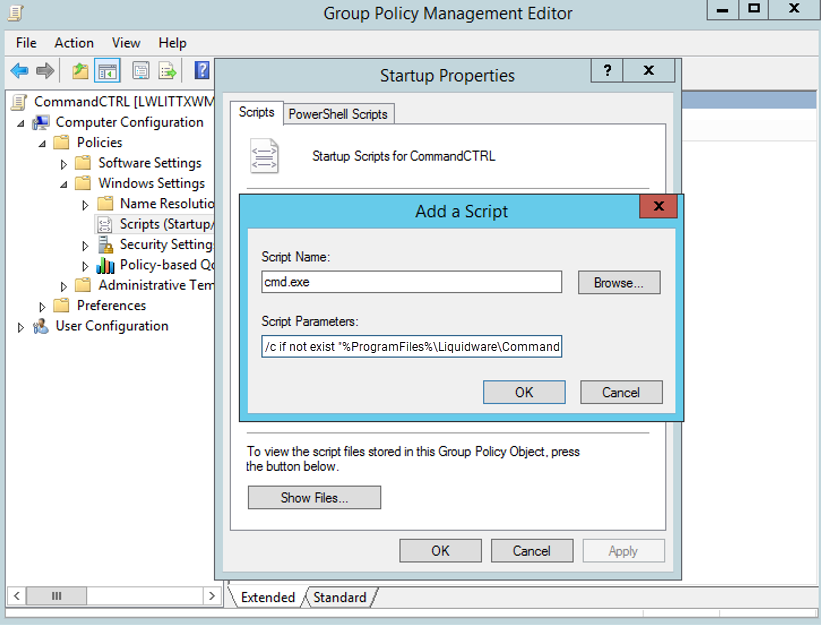
-
In the Script Parameters field, enter:
/c if not exist "%ProgramFiles%\Liquidware\CommandCtrl\ccagent.exe" msiexec.exe /i "\\server\share\CommandCTRL.Agent.amd64-xx.x.xx.xxxx.msi" /qn TENANTID="xxxxxxxxxx" APIKEY="xxxxxxxxxxxxxxx" -
Install the Agent directly into the base image if it is a hosted desktop like VMware, Citrix, Frame, AVD. Or use the GPO on startup script option mentioned above.
-
Use Microsoft End point manager for deploying to machines in the field.
Agent Updates
To enable or disable automatic updates, complete the following steps:
-
In the side navigation panel, go to Settings > Site.
-
In the Agent Settings section, the Enable/Disable switch located to the far right. The default is set to enable. It is recommended to accept automatic updates; however, this switch allows users the ability to control when the agent is updated.
-
Either leave the switch enabled or slide the switch to the left to disable the agent from automatically updating.
Updating the Agent
The MSI installer allows for easy deployment using any software distribution solution like Microsoft End Point Manager or any other software distribution tools or solutions on the market. A command line for silent installation is also available under the install agent section. If you initially installed the CommandCTRL Agent on multiple machines using the script provided by Liquidware, the Agent will update automatically whenever a new version is released. There is no need to manually update the software.
Note: If you already have the agent installed on a machine and you are updating the agent interactively (not silent), the Tenant ID and API Key fields will automatically populate in the Settings dialog box.
Agent Updates
To enable or disable automatic updates, complete the following steps:
-
In the side navigation panel, go to Settings > Site.
-
In the Agent Settings section, the Enable/Disable switch located to the far right. The default is set to enable. It is recommended to accept automatic updates; however, this switch allows users the ability to control when the agent is updated.
-
Either leave the switch enabled or slide the switch to the left to disable the agent from automatically updating.
Uninstalling the Agent
CommandCTRL collects historical metrics for each machine. After the CommandCTRL Agent has been uninstalled from a machine, no additional metrics will be collected.
Uninstall Using the CommandCTRL Method
To uninstall the Agent on multiple machines simultaneously, complete the following steps:
-
In the side navigation panel, go to Inventory > Machines.
-
On the Machines screen that appears, select the checkboxes beside each of the machines that you want to uninstall the Agent from.
-
In the top right corner of the header, click the Remove License button.
-
On the Unlicense Machine screen that pops up, select the Block Indefinitely radio button.
-
Click the Do Not Uninstall Agents toggler to switch it to Uninstall Agents.
-
Click the Block Machines button to uninstall the Agent on each machine and block them all from interacting with CommandCTRL.