ProfileUnity with FlexApp provides support for using Common Access Card (CAC) authentication when logging in to the ProfileUnity Management Console. CAC authentication provides a higher level of security by requiring a two-factor authentication process involving a smart card and a PIN.
ProfileUnity’s CAC Secure Mode is compatible with Microsoft Windows Server 2016, 2019, and 2022. The server should already have the CAC software installed and working.
Configuring CAC Secure Mode
To configure CAC Secure Mode, complete the following steps:
- RDP or console into the ProfileUnity Server and set the Liquidware Labs ProfileUnity Service to run as a domain service account. The service account must be a member of the local server Administrators group. If this is a ProfileUnity cluster, complete this for all nodes.
- Edit the "C:\Program Files (x86)\Liquidware Labs\ProfileUnity\ProfileUnity.Host.exe.config" Changing the DisableImpersonation setting from false to true.
- Restart the Liquidware Labs ProfileUnity Service.
- Log in to the ProfileUnity Management Console.
- Hover over your username in the top right corner of the screen.
- In the drop-down menu that appears, click Administration.
The Administration screen opens with the Settings tab displayed. - Click the Access and Authentication tab in the top right corner of the screen.
- In the Access Management section, click the Add Access button. In the New User or Group pop-up, click the Link to Active Directory checkbox, select the Active Directory domain and type the partial group name in the search box. Find the AD group created for Active Directory Console Administrators. Ensure the account type is Administrator. Click Save.
- In the Role Management section, enter the Active Directory username and password to serve as the Service Account for Deployment.
- Click the Add/Update button.
- Scroll up to the Authentication section.
- Select the Enable CAC Secure Mode checkbox.
- Click the Select Certificate Authorities from Local Machine Root field, then pick one or more certificate authorities to use from the drop-down list that appears.
- Select the Enable CAC Certificate Revocation List Cache checkbox.
- Click the Update button in the top right corner of the screen.
The browser refreshes and expects CAC authentication. If a CAC is available, a prompt for the CAC and accompanying PIN is presented. If there is trouble with this step, close the browser and start over. - Log in with the CAC enabled user, in the top right corner of the Administration screen, click the Settings tab.
| User Account | Recommended Permissions | Target |
|---|---|---|
| ProfileUnity Console Service Account | Full Control | Deployment Paths |
| ProfileUnity Console Service Account | Read Only Access | Active Directory, Users, Groups, OUs |
| ProfileUnity Console Service Account | Read Only Access | File shares for printers and importing shortcuts or registry keys. |
Troubleshooting Steps
If you see a 403 Forbidden error message, you are not authenticated with a CAC card. To resolve this issue, complete the following steps:
- Close the current browser and reopen.
- Connect to the ProfileUnity console URL.
- Select the appropriate certificate.
- Enter the PIN when prompted.
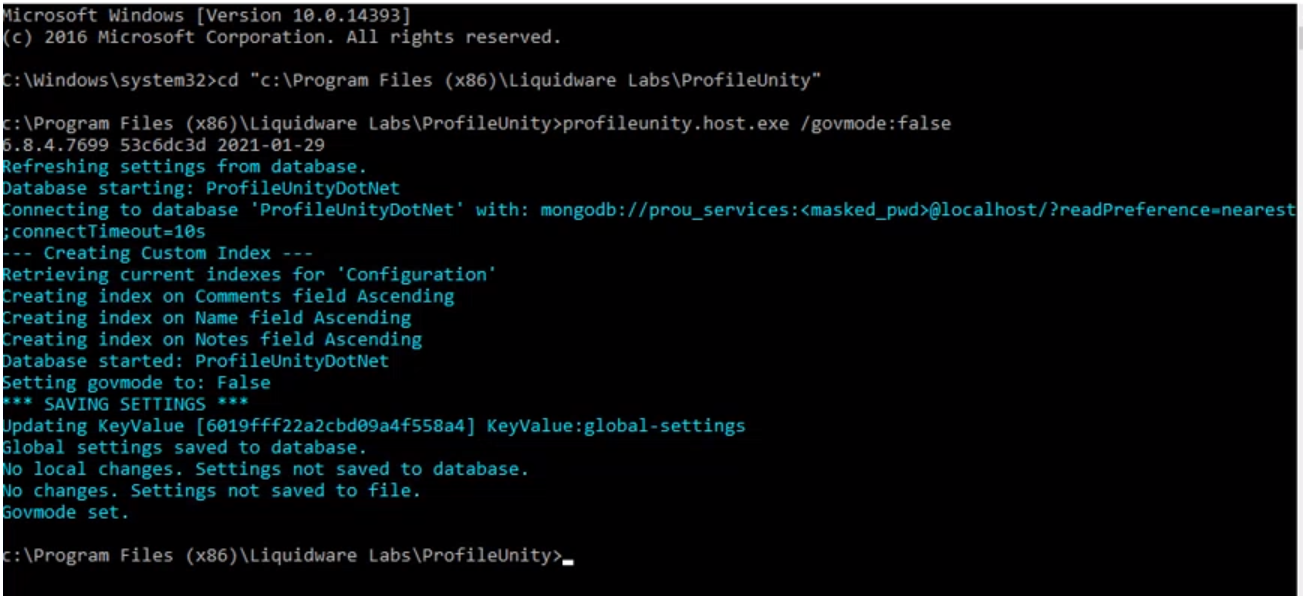
If these steps fail, you might need to disable CAC authentication. To turn off CAC mode in the user interface, stop the ProfileUnity Console service, and then run the following command in an Administrator Command Prompt:
C:\Program Files (x86)\Liquidware Labs\ProfileUnity\profileunity.host.exe /govmode:falseIf the command executes correctly, the following code should appear: