Your user and environment settings are stored in one or more configuration files, which are used to control ProfileUnity’s execution. During user logon, the ProfileUnity Client reads your configuration files and applies the settings to your client machines. Maintaining these files is accomplished by clicking the Configuration Management option in the left column of the ProfileUnity Management Console.
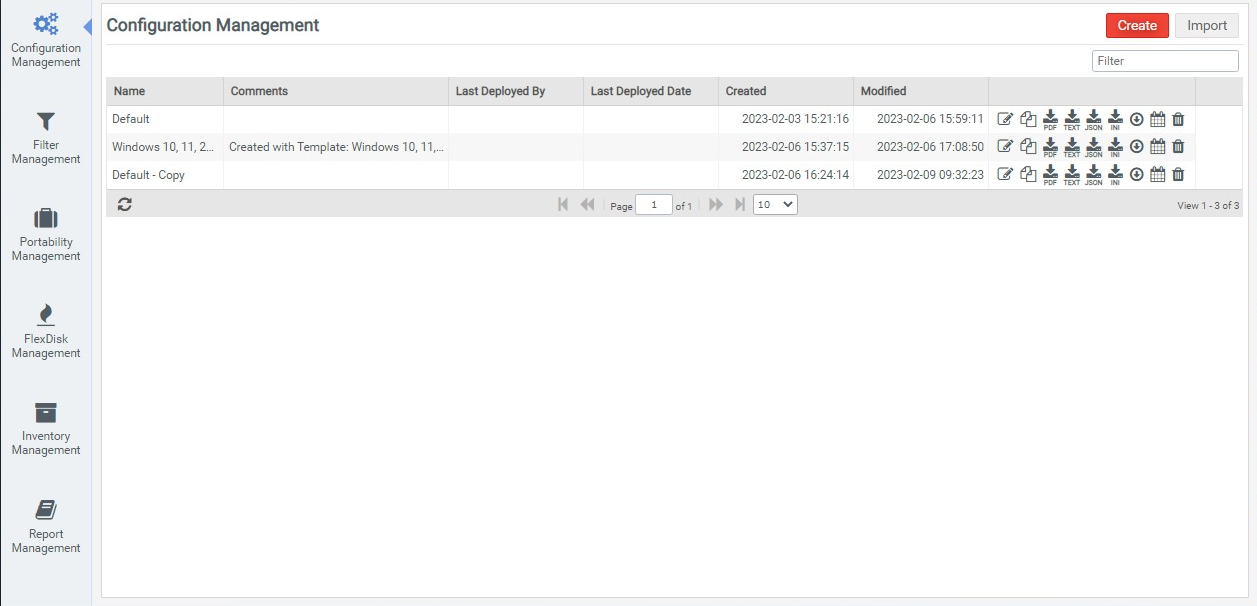
In addition to providing you with quick access buttons for creating, modifying, deleting, summarizing and downloading configuration files, the Configuration Management screen also lets you tell at a glance when each configuration was last deployed and by whom it was deployed. If the file has any notes associated with it, those are listed, too.
Creating a New Configuration
If you have not set up any configurations yet, your Configuration Management list will be empty. To create a new configuration for ProfileUnity, click the Create button, then choose Guided or Manual. Selecting Guided will walk you through the Guided Configuration Wizard and create a basic, editable configuration for ProfileUnity that enables the most popular services including Profile Portability, Folder Redirection and migration of certain folders, and FlexApp. If you select Manual, ProfileUnity creates an empty configuration that you can then edit to set up your customizations.
Copying an Existing Configuration
If you have one or more configurations in the Configuration Management list, you can also click the ![]() (Copy) button next to an existing Configuration’s name to clone an existing configuration to use as a starting point for a new configuration. Clicking the
(Copy) button next to an existing Configuration’s name to clone an existing configuration to use as a starting point for a new configuration. Clicking the ![]() (Copy) button opens the Configuration Editor with a copy of your existing configuration allowing you to rename the configuration and make any other changes to your settings.
(Copy) button opens the Configuration Editor with a copy of your existing configuration allowing you to rename the configuration and make any other changes to your settings.
Editing a Configuration
The Configuration Editor is where all configuration settings are managed. To start the Configuration Editor, click either the ![]() (Edit) or
(Edit) or ![]() (Copy) button in the Configuration Management list.
(Copy) button in the Configuration Management list.
A complete configuration is comprised of a group of smaller configuration modules that are designed to complete a specific task. When the editor is invoked, all the available configuration modules are listed.
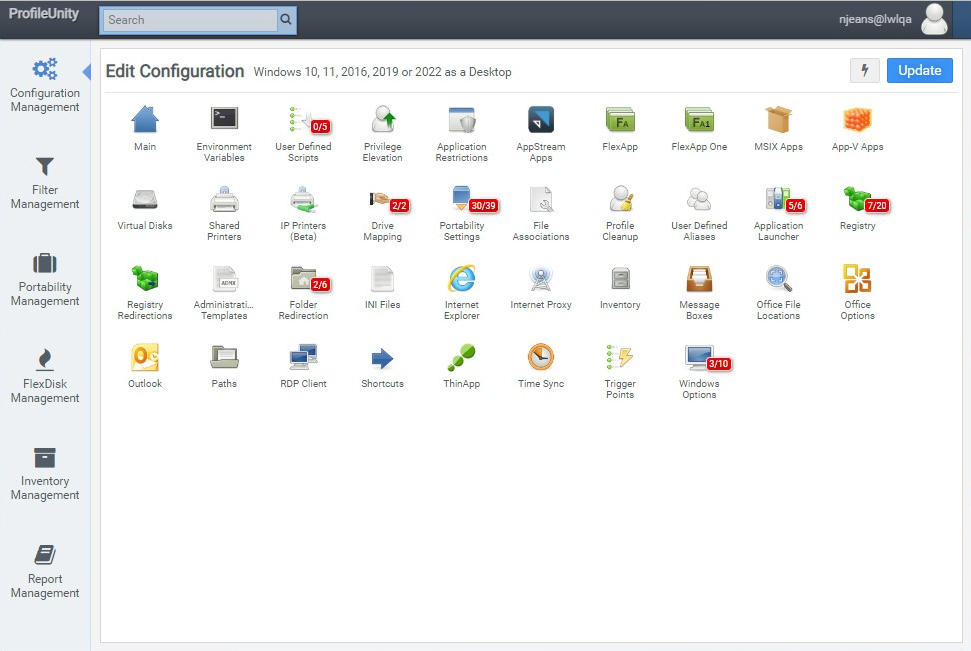
You do not have to configure settings in each of the modules. Customize your settings by choosing the modules that you need to configure for your specific environment. If there are rules set within a configuration module, a red overlay box will display next to the name of the module. The first number in the red overlay box indicates how many rules are active or enabled. The second number in the red overlay box indicates the total number of rules configured for this particular module. For example, if you see that the Portability Settings module has an overlay icon of 30/39, that means only 30 rules are enabled out of the 39 that are configured.
Note: For more information about each individual module, refer to Appendix C: Configuration Modules. In addition, refer to Appendix B: Configuration Macros to see how to use defined macros in an expression.
Editing Configuration Modules
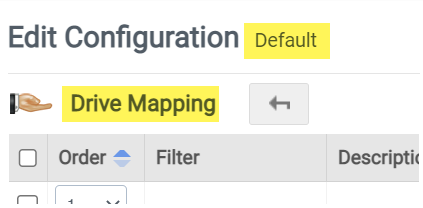
Each entry inside a configuration module is referred to as a configuration rule, and with the exception of the Main module, all modules allow you to create multiple configuration rules. The name of the ProfileUnity configuration that is being edited appears to the right of the words Edit Configuration. The name of the configuration module that is being edited appears below the words Edit Configuration. In the image below, for example, the Drive Mapping module within the Default configuration is being edited.
Clicking the Add…Rule button creates a new configuration element, which is then displayed in the Configuration Module Editor. In the image below, the Drive Mapping configuration module appears with multiple configuration rules defined.

Similar to the icons in the Configuration Editor, the icons to the right of each configuration rule in a module help you manage your settings. To make changes to any rule, click the appropriate icon:
| Button | Name | Meaning |
|---|---|---|
|
|
Edit | Modify an existing configuration rule |
|
|
Copy | Duplicate (clone) an existing configuration rule |
|
|
Enable or Disable | Disable or enable a configuration rule. Disabled rules are grayed out. |
|
|
Delete | Remove a configuration rule from the module |
Changing the Filter for Multiple Module Configuration Rules at the Same Time
Beginning with version 6.8.5, you can Mass update filter assignments within a module. To change the filter assignment for multiple rules at the same time, complete the following steps:
- Open the Configuration Module you want to make changes to.
- Select the checkbox beside each rule whose filter you want to change.
-

- Click the
 (Lightning) icon in the top right corner of the screen next to the Update button.
 - Select the Update Filter option from the drop-down menu that appears.
- On the Update Filter screen that opens, select the filter you want to apply to all selected rules.
- (Optional) Click on the Show Filter Details icon to the right of the selected filter to view the filter settings in detail.
- Click the Update button.
Ordering Configuration Rules Within the Modules
Configuration rules are processed sequentially starting with the first configuration rule and ending with the last configuration rule. However, the processing order does not indicate which configuration rule takes precedence. Configuration rule order and precedence can best be explained with the following two examples.
Drive Mapping Order Example
In the image below, two configuration rules have been defined for the Drive Mapping configuration module. The first configuration rule maps the H: drive to a share located on SVR-A. The second configuration rule maps the H: drive to a share located on SVR-B. When the first configuration rule is processed, the H: drive is mapped to SVR-A. The second configuration rule cannot map the H: drive to SVR-B because the H: drive is already mapped to SVR-A. In this example, the first configuration element processed wins.

Environment Variables Order Example
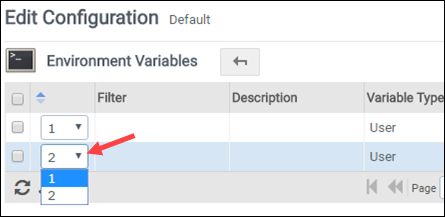
In the image below, two configuration rules have been defined for the Environment Variables configuration module. Both rules modify the environment variable TEST. When the first configuration rule is processed, the TEST environment variable is set to the value FIRST. When the second configuration rule is processed, the TEST environment variable is set to the value SECOND. In this example, the last configuration rule processed wins.

The order of configuration rules is therefore very important and can have a significant impact on expected results. You can change the processing order of a configuration rule by left-clicking on the number column and choosing a new order number.
Note that it is not just an item's order number that can affect how the item is applied. Other settings, such as when a rule is executed, how often a rule is executed, and whether it is disabled or enabled, can also have an impact.
Saving Your Changes
When you have finished editing a configuration, click the Update button in the top right corner of the screen to save your changes. All unsaved changes are discarded when you leave the Configuration Management screen.
Importing and Exporting Configurations
Individual configurations can also be imported into the ProfileUnity Management Console by clicking the Import button in the top right corner of the Management Console screen and specifying the location of the JavaScript Object Notation (JSON) configuration file. The new configuration is then added to the Configuration Management list. When the configuration is imported, all filters and portability rules that help make up that configuration are created as part of the process. However, if there are already existing filters or portability rules with the same name in the Management Console, the existing settings take precedence and the settings in the JSON configuration file are not imported.
To export or backup an existing configuration, complete the following steps:
- Go to the Configuration Management screen and locate the name of the configuration in the list.
- Select the
 (Export Configuration) option from the configuration’s row.
 - Specify the location where the JSON file should be saved.
Selective Importing and Exporting of Individual Configuration Module Settings
ProfileUnity also enables you to selectively choose which settings in each Configuration Module to export so they can be shared among other Configurations. One or more settings can be exported from one or more Configuration Modules at the same time. These settings can then be imported into an existing Configuration to supplement the settings that already exist in that Configuration.
Note: While a partial Configuration export can be imported into an existing Configuration, a partial export cannot be imported as a brand-new Configuration because it does not contain all the required settings.
To export configuration module settings, complete the following steps:
- Open the Configuration Module whose settings you want to export.
- Select the checkbox beside each setting you want to export.
-
- (Optional) Repeat the prior steps to select additional settings from other Configuration Modules within the Configuration.
- After you have finished selecting all settings you would like to export from the Configuration, click the (Lightning) icon in the top right corner of the screen next to the Update button.
- Select Export Selected from the drop-down menu that appears.
- The JSON file is then downloaded.
To import this collection of settings to another Configuration, complete the following steps:
- Open the Configuration that you want to import settings into.
- Click the (Lightning) icon.
- Select Import from the drop-down menu that appears.
- Locate and select the JSON file containing the settings you want to import.
- Click the Open button.
- Each individual setting in the file is then added to its associated Configuration Module in the receiving Configuration.
Activating Configurations
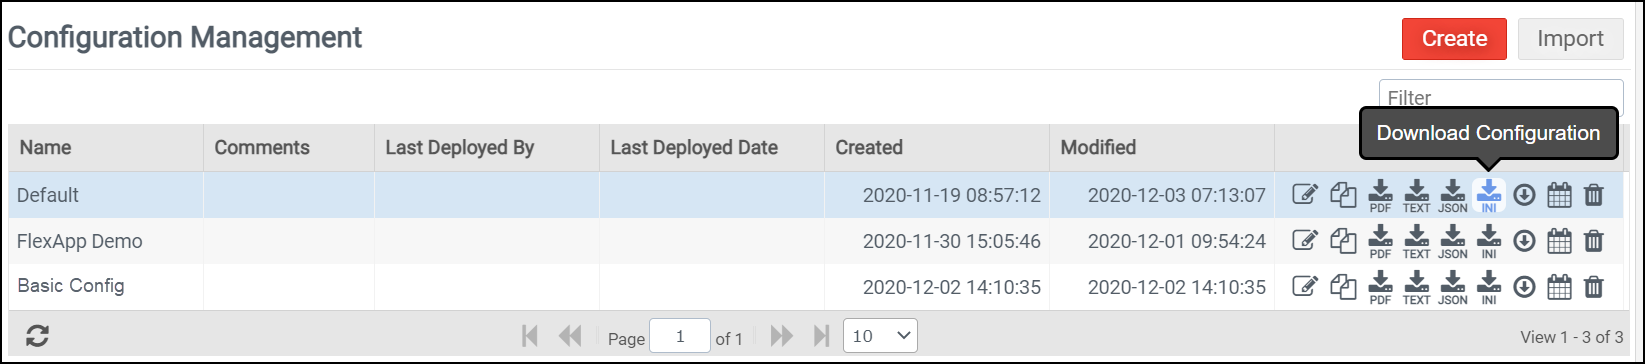
After you finish making changes to your configuration, you need to make those changes available to the ProfileUnity Client so that it can apply your settings with each user login. Each configuration is stored in an INI file which is saved in the same location where the ProfileUnity Client is installed. To create an INI file:
- Go to the Configuration Management screen and locate the name of the Configuration in the list.
- Click the
 (Download Configuration) icon in the Configuration row.
 - Save this INI file to the same location where the ProfileUnity Client is installed.
Important: Anytime you make a change to a configuration you must re-download the INI file. In addition, those changes do not take effect until the next logon event from the user. If the user is currently logged in when the configuration file is downloaded, the old configuration settings remain in effect.
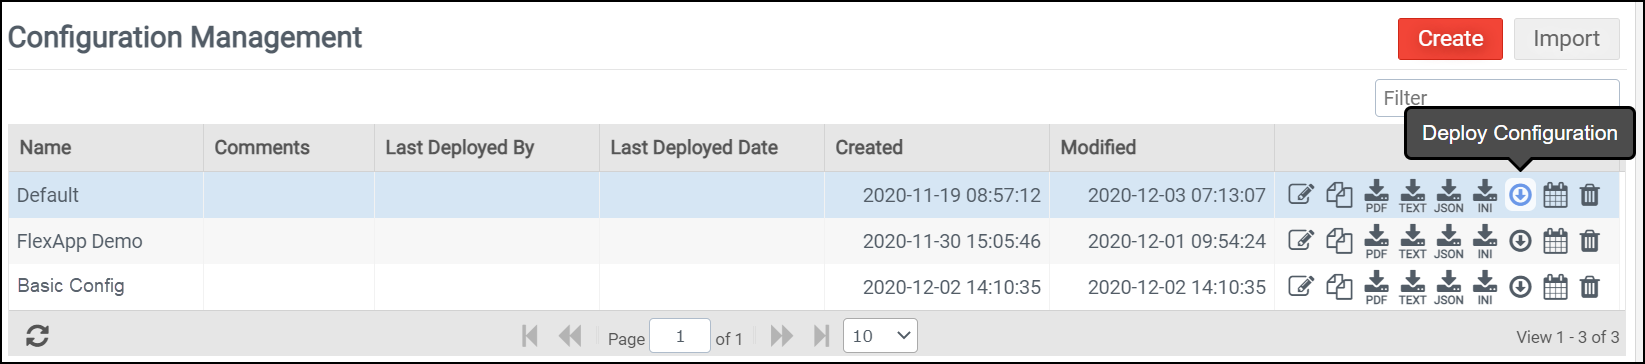
Automatically Deploying ProfileUnity Configurations
ProfileUnity also allows you to deploy your configuration changes automatically to a specified location, so that you do not have to download and copy the files manually each time. From the Configuration Management list, click the Deploy Configuration icon to the right of the name of the Configuration.
Configuration files are INI files that must be copied to the same location where you installed the ProfileUnity Client, which is known as the Deployment Path. Configuration changes take effect the next time the user logs in. If a user is already logged in when a new configuration file is deployed, their session still uses the old configuration settings until the user logs out of their current session.
There are several places you can specify or change the Deployment Path in the ProfileUnity Management Console.
The Deployment Path is stored as part of the Administration settings. To get there, complete the following steps:
- Log in to the ProfileUnity Management Console.
- Hover over your username in the top right corner of the screen.
- In the drop-down menu that appears, select the Administration option.
- The Administration screen opens with the Settings tab displayed.
- Scroll down to the ProfileUnity Tools section.
- In the Deployment Path field, enter the location where the ProfileUnity Client is installed.
- Click the Update button in the top right corner of the screen.
The Deployment Path can also be specified in the global settings when you log in to the ProfileUnity Management Console for the first time:
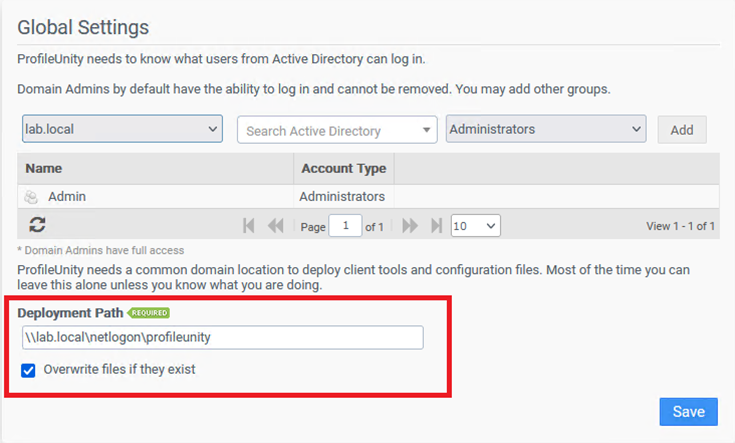
The Deployment Path is again displayed as the last step in the Guided Configuration Wizard. From here, you can deploy the new Configuration as long as you are logged in as an Active Directory user. To have ProfileUnity copy the Configuration INI file to the specified Deployment Path, click the Download or Deploy Configuration button and deploy the Configuration. If you are logged in as a non-Active Directory user, click the Download or Deploy Configuration button and download the Configuration to manually copy the Configuration INI to your Deployment Path.

Or if you still prefer to download and copy Configuration INI files to the Deployment Path yourself, click the ![]() (Download Configuration) icon to the right of the name of the Configuration in the Configuration Management list and then copy it to the correct location.
(Download Configuration) icon to the right of the name of the Configuration in the Configuration Management list and then copy it to the correct location.
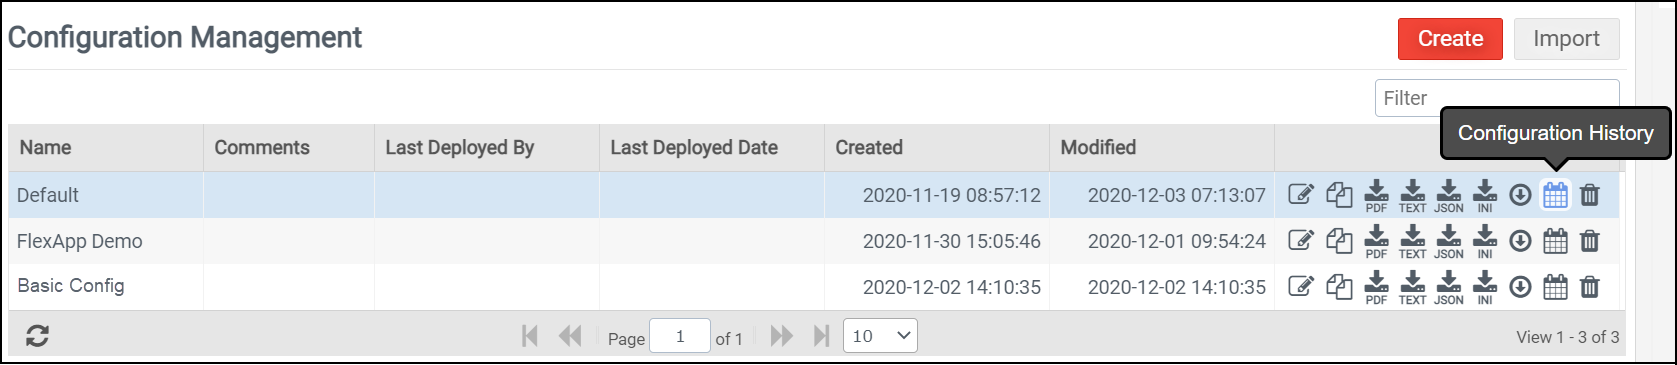
Using the Configuration Rollback Feature
As part of the configuration deployment feature, ProfileUnity has a built-in retention policy. Anytime that a Configuration file is updated, it is saved. By default, ProfileUnity keeps track of the last five updates to each Configuration. To change the number of Configuration files to save, modify the Configuration Revision Retention setting in the Inventory section of the Settings tab on the Administration screen. You can view the list of saved changes by clicking on the Configuration History icon to the right of each Configuration name on the Configuration Management screen.
To restore any of the last five versions of a particular Configuration, click the Restore Configuration icon to the right of the Configuration date and time stamp.
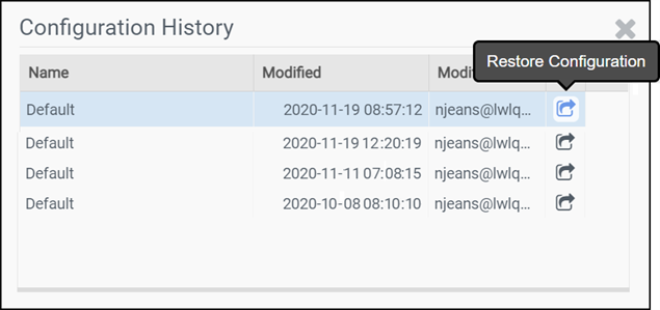
Clicking on the Restore Configuration icon creates a new Configuration in the Configuration Management list that starts with the original Configuration name and ends with “Restored” and the date and time stamp of the restored configuration. The older Configuration is restored to the Management Console Configuration Management list. However, you still need to deploy the restored Configuration to the Deployment Path in order for it to affect your user’s settings.
Important: Anytime you delete an existing Configuration in the Management Console or need to restore an older version, remember to also go to your environment’s Deployment Path to manually delete the Configuration INI files that no longer need to be applied in your environment.
Maintaining Security While Changing User Settings
ProfileUnity executes in the security context of the user logging on to the network. Privileges are never elevated during execution, ensuring your security policies are preserved. Maintaining security is not without cost. ProfileUnity is only able to modify settings the user can modify. You should consider the impact that security will have on your configuration. For example, attempting to modify a registry value that the user does not have permission to will fail.
Working with Multiple Configurations
Depending on the needs in your environment, ProfileUnity can be set up to run one or more configurations. Multiple configurations allow your settings to be grouped into logical boundaries. For example, in a large organization with multiple IT departments, each department can have its own configuration. Members of one department can modify their settings without disturbing the settings of any other department. Configurations can also be layered to enforce an order of operations. For example, you can map drives in one configuration and then access objects on those drives in a subsequent configuration.
When ProfileUnity executes, it obtains the list of available configurations from the authenticating domain controller. If the configuration Default is present, it is always processed first. The remaining configurations are then processed in alphabetical order.
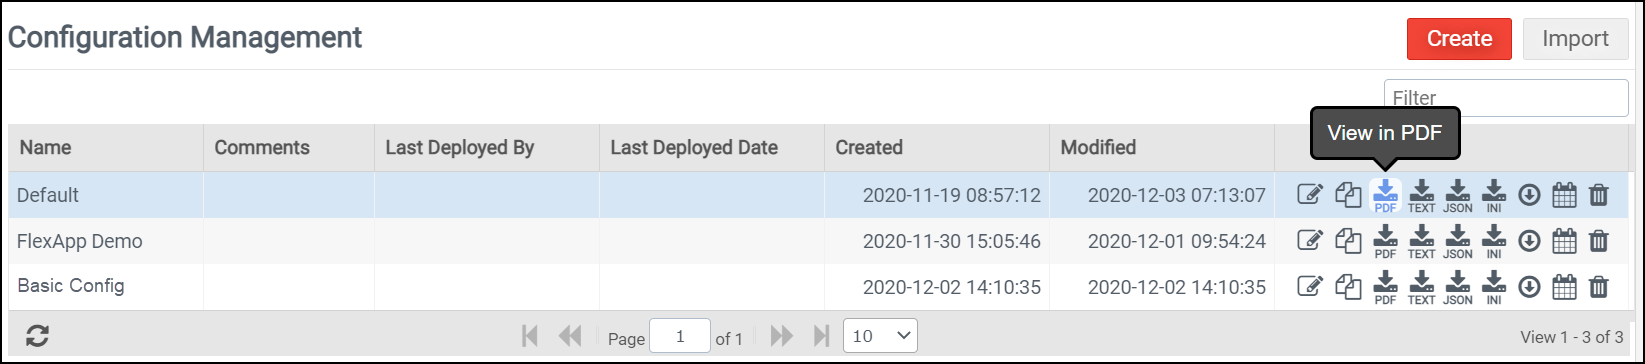
Generating a Configuration Summary Report
With the mission of decoupling user settings and data from a device’s operating system, ProfileUnity offers a high level of customization. To document all the settings for a configuration, go to the Configuration Management screen and click either the View in PDF or View in Text icon next to the name of the configuration to download the report in either a PDF or text format. These configuration reports can also be used to troubleshoot issues.
Deleting Configurations
To remove an old or unused configuration from the Configuration Management screen, click the Delete icon next to the name of the configuration, then confirm that you want to proceed with the deletion. Note that after the configuration is deleted, it cannot be recovered.