The Management Console includes an easy-to-use Guided Configuration wizard that walks you through the creation and assignment of ProfileUnity groups and group policies. The wizard also allows you to create a basic configuration for your environment that includes Profile Portability, Folder Redirection, and migration of certain folders, and optionally turns on and configures FlexApp.
The first time you log in to the ProfileUnity Management Console, the Guided Configuration wizard starts automatically.
You can also choose to start the Guided Configuration Wizard manually any time you create a new configuration by completing the following steps:
- Click the Configuration Management option in the left column.
- Click the Create button.
- On the New Configuration screen that pops up, click the Guided option.
Note: The number of steps in the Guided Configuration Wizard varies depending on which template you select in the first step and whether you are logged in using an Active Directory account or not.
Step 1: Select a Template for Configuration
Liquidware has created a library of configuration templates that automatically pre-configure settings based on the goals you are trying to achieve in your environment. You can also add or import custom templates into this library from the Administration area.
- On the Guided Setup screen, select a template from the Template Library drop-down list. Your configuration will be based on the template you choose.
- Click the Next button.
Step 2: Assign Cloud Storage Credentials
If the template chosen makes use of cloud storage for user profiles and ProfileUnity’s configuration files, then you will be given the opportunity to configure your cloud storage settings. Otherwise, this step will not be included. Refer to the Using Cloud Storage Guide for instructions on configuring your cloud storage.
If no cloud storage credentials have previously been saved, the wizard will ask you for credentials for the ProfileUnity Console and the ProfileUnity Client user accounts. You can add other cloud storage credentials by clicking the Add Cloud Credentials button and providing the necessary information. If you need to edit existing credentials, exit the wizard and go to the Administration area where you can make changes in the Cloud Storage Settings section.
In addition to the credentials, you must supply the cloud storage path for configuration files, which must be in the configurations folder. You also need to supply the cloud storage path for user portability files, which must be in the portability folder. If you are using Amazon S3 cloud storage, your paths might be similar to the following examples:
S3://lw-profileunity-us-east-1/configurations
S3://lw-profileunity-us-east-1/portability
When you are done configuring the settings, click Validate Cloud Credentials, then click the Next button.
Step 3: Assign Values to Variables
One or more variables in the template need values that are specific to your environment. For example, you must configure a default home directory or location where the user’s settings and data will be stored on an existing server in your network. Remember to include %username% in the path so that each user has a unique data folder. Then, enter any other values that are required.
When you are finished assigning values, click Next to proceed.
Storage Path Permissions
ProfileUnity needs the appropriate permissions configured on the storage path for proper operation.
- NTFS Permissions—Listed below are the recommended level NTFS permissions for the storage path.
-
User Account Recommended Permissions Folder Administrator Full Control This folder, subfolders, and files Authenticated User Modify This folder only Creator/Owner Modify Subfolders and files only
- Share Permissions—The recommended share permissions for the share are to match the NTFS permissions or rely solely on the NTFS permissions and set the share permissions to Everyone Full Control.
Step 4: Deploy VHDX ProfileDisk
If the template you chose includes the use of a ProfileDisk, then you must configure the ProfileDisk settings. Otherwise, this step is not included.
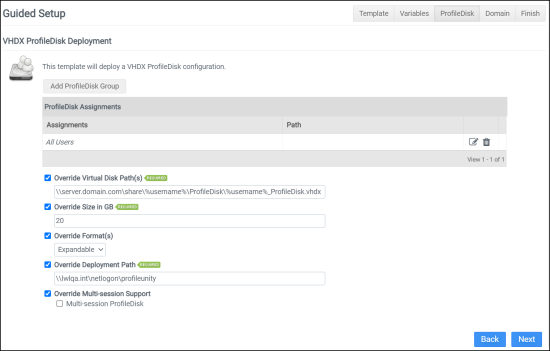
All override settings here will supersede the selected settings in all ProfileDisk assignments in this configuration. For example, if Override Multi-session Support is selected, then Multi-session ProfileDisk will be turned on or off for all ProfileDisk assignments in this configuration, whether it is selected or not in the XML file. If Override Multi-session Support is not selected, then the configuration within each ProfileDisk will determine how it is handled. The overrides only affect the clientsettings.xml file and not the configuration INI itself.
When you have finished configuring the override settings, click the Next button.
When the wizard asks whether ProfileUnity should deploy the ProfileDisk configuration for you, select Yes if you want ProfileUnity to deploy the configuration automatically.
Step 5: Configure Active Directory GPOs
If you are logged in as an Active Directory admin to the ProfileUnity Management Console, the next step in the guided configuration is to configure Active Directory so that ProfileUnity can be activated without physically installing the Client on all of your desktops.
Note: The AD Configuration is applied globally to all ProfileUnity Configurations. Active Directory does not need to be re-configured for every new Configuration that is created. Therefore, you can choose to skip this step by either clicking on Next or you can check Always skip this step so that you do not see this step the next time you run the wizard.
If you click Run GPO Integration, ProfileUnity attempts to configure Active Directory using the Computer OU that you set up before installation. However, in order for this option to work correctly, you must be logged in as an Active Directory admin to the ProfileUnity Management Console.
If you prefer to configure Active Directory yourself, click Next. Also click Next if you have already configured Active Directory on a prior run through the Guided Configuration Wizard, or if you are not currently logged in as an Active Directory admin. ProfileUnity then asks you to confirm that you do not want to automate the AD configuration. You can always choose to log in again later as an Active Directory admin and have ProfileUnity automate the Active Directory configuration when creating another configuration. Just remember that Active Directory must be configured before ProfileUnity will work for your users.
The instructions for manually configuring Active Directory can be found in the Manually Preparing Your Environment to Use the ProfileUnity Client section of the ProfileUnity Installation and Configuration guide.
After clicking Run GPO Integration, ProfileUnity automatically configures a few items. The wizard will configure the Group Policy Object for the ProfileUnity Computer OU you select. In addition, the wizard will deploy the client tools to a ProfileUnity subdirectory in the location you specified for the Deployment Path in an earlier step. This is typically your NETLOGON share of your domain controller.
When you are done with the AD Configuration, click Next to proceed.
Step 6: Confirm Your Settings & Save Your Configuration
As a final step, the wizard needs to create an INI file that incorporates the configuration settings from the previous steps and includes basic configuration for all Portability Management rule sets as well. This file is then made available to the ProfileUnity Client so that it can apply your settings with each user login. Follow the steps below to create this configuration file and save it to the same location where the ProfileUnity Client is installed.
If you are logged in as an Active Directory user with write permissions to the Deployment Path, the configuration file can be deployed directly to the Deployment Path. To have ProfileUnity copy the Configuration INI file to the specified Deployment Path, complete the following steps:
- Click the Download or Deploy Configuration button.
- On the popup screen that appears, select the Domain option in the Platform field and confirm that the Deployment Path is correct.
- Click the Deploy button.
If you are logged in as a non-Active Directory user or do not have write permissions to the Deployment Path, you will need to download and manually copy the configuration file to the same folder where the ProfileUnity Client either is or will be located. To download the configuration file, complete the following steps:
- Click the Download or Deploy Configuration button.
- On the popup screen that appears, select the Download option in the Platform field.
- Click the Deploy button and the INI file will be downloaded to your web browser.
- Copy the INI file to your Deployment Path manually.
For those using cloud storage, refer to the Using Cloud Storage Guide for guidance. Your deployment path will need to point to your “configurations” folder. For example, if you are using Amazon S3 cloud storage, your deployment path might look something like this: S3://lw-profileunity-us-east-1/configurations
If you are using cloud storage, the configuration file can be deployed directly to the cloud Deployment Path. To have ProfileUnity copy the Configuration INI file to the specified Deployment Path:
- Click the Download or Deploy Configuration button.
- On the popup screen that appears, select the Cloud option in the Platform field, then confirm that the Deployment Path is correct.
- Choose your ProfileUnity Console account for the Cloud Credentials.
- Click the Deploy button.
In a similar way, you can download or deploy the ProfileUnity Client Tools from this final step of the Guided Configuration Wizard if you have not done so already. A link to download the FlexApp Packaging Console is also included in this step. Note that if you choose not to download or deploy either software package now, you can access both the Client Tools and the FlexApp Packaging Console from the Administration section of the ProfileUnity Management Console at any time.
When you are done with the wizard, click the Finish button.