ProfileUnity was designed to deliver flexible profiles across your environment without having to distribute the software to each individual machine. The ProfileUnity Client takes advantage of Microsoft Active Directory (AD) and Group Policy Objects (GPOs) to accomplish its work. This section covers the changes that must be made to the environment.
Note: Administrators can make these changes manually following these instructions or they can skip this section and use the Guided Configuration Wizard in the Management Console to have ProfileUnity automate these environment changes.
Create a GPO in Windows Server Active Directory
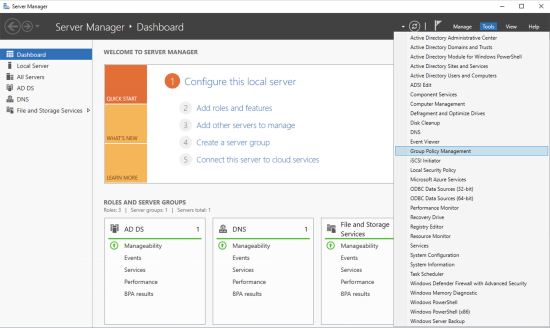
- To open the Group Policy Management Console in a Windows Server 2016 or newer Domain Controller, start the Server Manager Dashboard, click the Tools menu, and select Group Policy Management from the drop-down menu that appears.
-
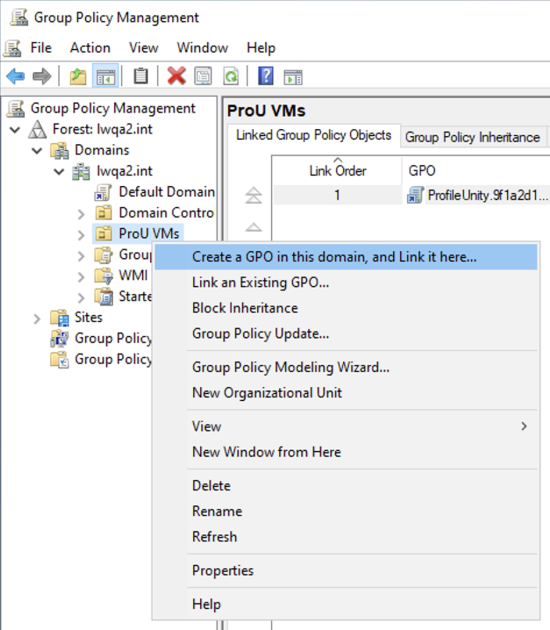
- Right-click your ProfileUnity Computer OU and select Create a GPO in this domain, and Link it here… to create a group policy and link it to this OU.
-
- Give this group policy object any name you want, such as
ProfileUnity.
Assign a Group Policy Computer Startup Script
Installation of the ProfileUnity Client is triggered through Group Policy computer startup scripts. To configure the startup script for the ProfileUnity GPO, complete the following steps:
- Open the Group Policy Management Console on your server.
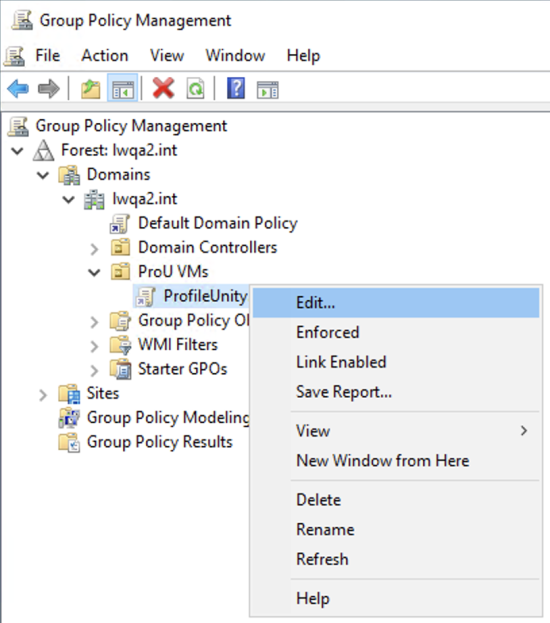
- Find your ProfileUnity Group Policy Object.
- Right-click the GPO and select the Edit option.
- The Group Policy Management Editoropens.
-
- On the left side of the Group Policy Management Editor, go to Computer Configuration > Policies > Windows Settings > Scripts (Startup/Shutdown).
- On the right side of the editor, right-click Startup and select Properties to set up the startup script.
-

- Click the Add button to add a new startup script.
- (If you are using cloud storage, skip to Step 9.) Assign the Startup.exe as a startup script.
- Click OK twice to save your changes.
-
- Script Name:
-
Copy
\\<domain name>\netlogon\ProfileUnity\LwL.ProfileUnity.Client.Startup.exe
-
- Script Parameters: No parameters needed.
- Script Name:
-
Note: This policy should be applied to the OU(s) that contains the computers that will execute ProfileUnity. You should replace <domain name> in the above example with the name of your domain so that the path resolves to your NETLOGON path.
- (For devices using cloud storage only) Assigning the startup script is a bit different for environments using cloud storage. Instead of running the startup script directly, PowerShell executes the script. Copy the script and parameters that appear below. Click OK twice to save your changes.
- For devices using cloud storage
- Script Name:
powershell.exe - Script Parameters: The script parameters change depending on the version of ProfileUnity you are running. Refer to the knowledge base article entitled How Do I Modify The Startup GPO Used For Cloud Based Desktops When Upgrading To Newer Version Of ProfileUnity and select the parameters based on your version of ProfileUnity.
- Script Name:
Assign a Group Policy User Logoff Script
Saving user profile information by the ProfileUnity Client is triggered through Group Policy user logoff scripts. To configure the logoff script for the ProfileUnity GPO:
- Open the Group Policy Management Editor.
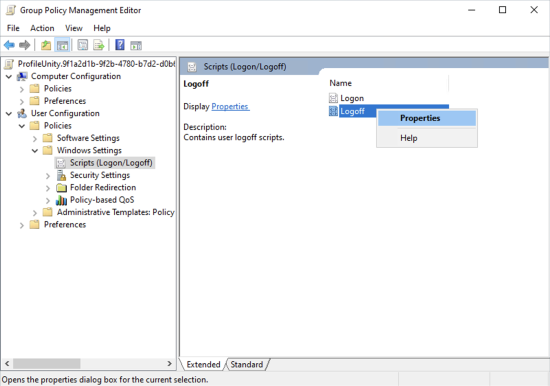
- On the left side of the editor, go to User Configuration > Policies > Windows Settings > Scripts (Logon/Logoff).
- On the right side of the editor, double-click Logoff.
-
- On the Logoff Properties screen that appears, click the Add button to add a new logoff script and use the Script Name that appears below.
- Click OK twice to save your changes.
-
- Script Name:
-
Copy
C:\Program Files\ProfileUnity\Client.NET\LwL.ProfileUnity.Client.Logoff.exe
-
- Script Parameters: No parameters needed.
- Script Name:
-
Note: This policy should be applied to the OU(s) that contains the users that will execute ProfileUnity.
Configure GPO Administrative Template Settings
ProfileUnity Client Tools include ADM and ADMX Administrative Templates for configuring GPO settings so that ProfileUnity is applied to select AD computers at startup and users upon their next login. The Classic Administrative Template (ADM) can be used on all Windows desktops. The newer file format, ADMX, is only for use with user machines running Windows 10 or higher or Windows Server 2016 or higher.
Adding the ProfileUnity ADM Template
- Open the Group Policy Management Editor.
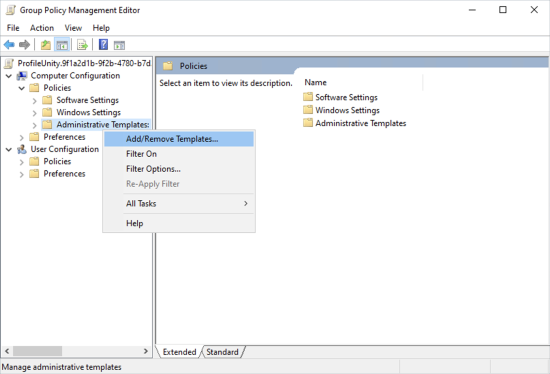
- On the left side of the editor, go to Computer Configuration > Policies > Administrative Templates.
- Right-click the GPO and select the Add/Remove Templates option.
-
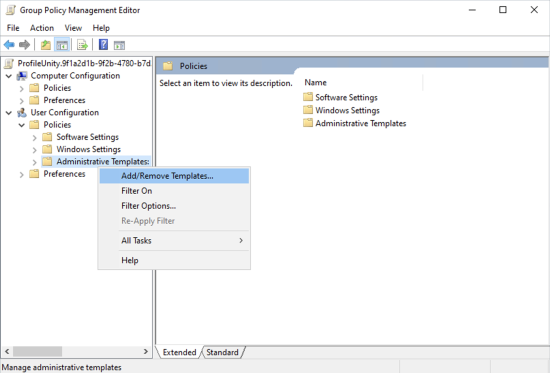
- Because the ProfileUnity ADM contains both computer and user settings, you can also add the template under the User Configuration section instead of the Computer Configuration section.
-
- On the Add/Remove Templates screen that appears, click the Add button to add a new template.
- Browse to the location where you extracted the ProfileUnity Client files. By default, this is the NETLOGON\profileunity folder stored in your domain. Select the ProfileUnity.adm template, then click the Open button.
-
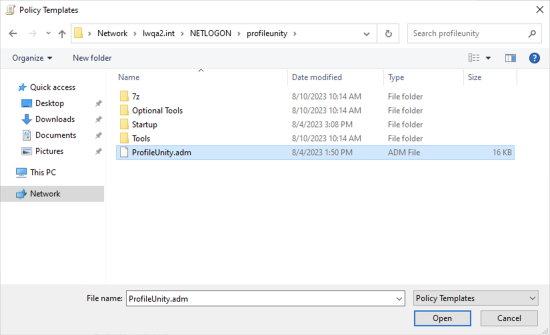
- Close the Add popup screen.
The ProfileUnity ADM template is added in the following locations:
| Windows Platform | Location of ProfileUnity ADM Settings |
|---|---|
| Windows 10 and higher, Windows Server 2016 and higher | Computer Configuration (and User Configuration) > Policies > Administrative Templates > Classic Administrative Templates (ADM) > Liquidware Labs > ProfileUnity |
Configuring and Enabling Computer ADM Template Settings
- Open the Group Policy Management Editor.
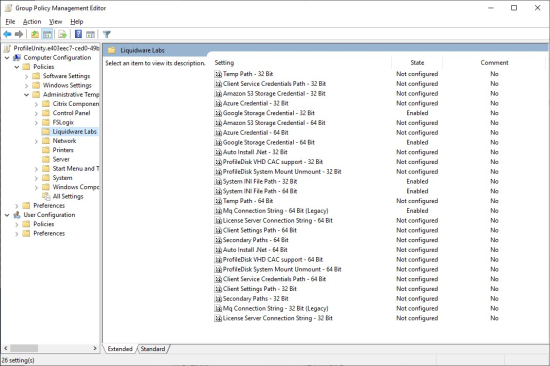
- On the left side of the editor, go to Computer Configuration > Policies > Administrative Templates > Classic Administrative Templates (ADM) > Liquidware Labs > ProfileUnity.
- A list of settings for 32-bit and 64-bit computers is displayed.
-
Important: The 32-bit values must match the 64-bit values, regardless of what architecture is in use! In addition, these registry settings are not stored in a policy key because they are considered preferences. Therefore, if the Group Policy Object that implements these settings is ever removed, these registry settings will remain.
-
-
- Auto Install .NET—Automatically installs Microsoft .NET if missing.
- System INI File Path—Specifies the UNC or cloud storage path containing the ProfileUnity INI configuration files. By default, this is the ProfileUnity\Startup folder in the NETLOGON share on your domain controller. For cloud storage, you must point to your configurations folder. For example:
S3://lw-profileunity-us-east-1/configurations. - Temp Path—Specifies the local path containing the ProfileUnity temp files. By default, this is the User’s
%temp%folder. - Client Service Credentials Path—Specifies the path to the Client service executable’s credentials file. By default, this is the ProfileUnity folder in the NETLOGON share on your domain controller. For cloud storage, you must point to your configurations folder. For example:
S3://lw-profileunity-us-east-1/configurations - Client Settings Path—Specifies the path to the clientsettings.xml configuration file. This file handles client-side settings for requesting licensing, ProfileDisk VHDX configurations, and FlexDisk configurations. By default, this is the ProfileUnity folder in the NETLOGON share on your domain controller. For cloud storage, you must point to your configurations folder. For example:
S3://lw-profileunity-us-east-1/configurations. - ProfileDisk VHD CAC Support—ProfileDisk when leveraging Common Access Card (CAC) Security requires a setting so we know to impersonate the ProfileUnity as a Service user when connecting to the file share. We CANNOT impersonate a CAC user for security reasons. We leverage ProfileUnity as a Service username and password. This also means the minimum requirement for ProfileDisk VHD with CAC, is to have the ProfileUnity as a Service account full control on the file share. When it comes to ProfileDisk VMDK and CAC this setting is NOT required.
- ProfileDisk System Mount Unmount—Forces ProfileDisk to be (un)mounted as SYSTEM instead of the user or a service account. This option can be used with environments that have the Secondary Logon service Disabled.
- Amazon S3 Storage Credential—Holds encrypted Amazon S3 storage credentials. To get encrypted credentials, scroll to the Cloud Storage Settings section of the Administration screen within the ProfileUnity Management Console. Click Copy to Clipboard next to the Amazon Client Credentials. This copies the encrypted credentials to the clipboard and then you can paste them here.
- Azure Credential—Holds encrypted Azure storage credentials. To get encrypted credentials, scroll to the Cloud Storage Settings section of the Administration screen within the ProfileUnity Management Console. Click Copy to Clipboard next to the Azure Client Credentials. This copies the encrypted credentials to the clipboard and then you can paste them here.
- Secondary Azure Credential—Holds encrypted secondary Azure storage credentials. To get encrypted credentials, scroll to the Cloud Storage Settings section of the Administration screen within the ProfileUnity Management Console. Click Copy to Clipboard next to the Azure Client Credentials. This copies the encrypted credentials to the clipboard and then you can paste them here.
- Google Storage Credential—Holds encrypted Google storage credentials. To get encrypted credentials, scroll to the Cloud Storage Settings section of the Administration screen within the ProfileUnity Management Console. Click Copy to Clipboard next to the Google Client Credentials. This copies the encrypted credentials to the clipboard and then you can paste them here.
- Secondary Paths—This setting allows administrators to specify both primary path and secondary path prefixes for the storage of INI Configuration and ClientSettings and Creds files. This allows for failover protection should access to the primary location fail. Mixing UNC paths with cloud paths is allowed.
- Example 1:
s3://b1/f1 > s3://b2/f1, gs://b3/f1 - Example 2:
\\n1\f2 > \\n2\f2, \\n3\f2, gs://b5/f2
- Example 1:
- Mq Connection String (Legacy) —Holds encrypted message queue connection string for ProfileUnity 6.8.4 R2 and prior versions.
- License Server Connection String —Holds encrypted license server connection string for ProfileUnity 6.8.5 and higher.
- Double-click any of the 32-bit policies to change the ADM policy setting.
- Select the Enabled radio button, then fill in any required parameters.
-
- Click the OK button to save your changes.
- Repeat the same steps with the 64-bit ADM policy settings.
Configuring and Enabling User ADM Template Settings
- Open the Group Policy Management Editor.
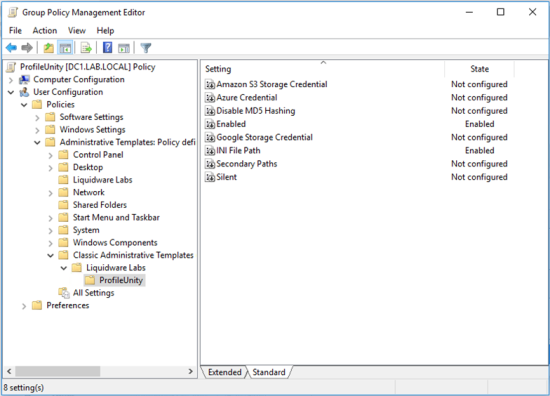
- On the left side of the editor, go to User Configuration > Policies > Administrative Templates > Classic Administrative Templates (ADM) > Liquidware Labs > ProfileUnity.
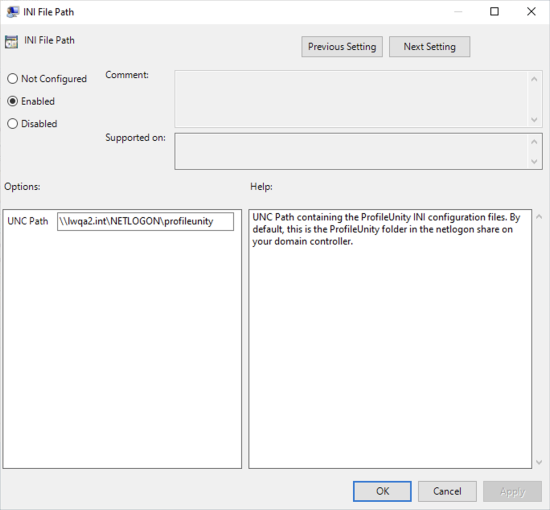
- Enable the following two user settings: Enabled and INI File Path.
- (Optional) Enable other settings if you want to use them.
-
-
Important: These registry settings are not stored in a policy key because they are considered preferences. Therefore, if the Group Policy Object that implements these settings is ever removed, these registry settings will remain.
- Enabled—Allows ProfileUnity to be enabled on a per user basis.
- INI File Path—Specifies the UNC or cloud storage path containing the ProfileUnity INI configuration files. By default, this is the ProfileUnity folder in the NETLOGON share on your domain controller. For cloud storage, you must point to your configurations folder. For example:
S3://lw-profileunity-us-east-1/configurations - Silent—The ProfileUnity splash screen seen on desktops at startup is helpful in that it displays which configurations are being run and assists in troubleshooting logon and logoff processes executed by ProfileUnity. After a ProfileUnity configuration has been refined, the splash screen can be turned off (if you want) by enabling this option to allow ProfileUnity to run silently.
- Disable MD5 Hashing (formerly Disable Time Stamp)—To prevent saving parts of the profile that have not changed since the last login, the Portability engine has replaced doing a time stamp check with using a manifest and hashing algorithm. In most cases, it is important to have the have the hashing algorithm running to save time at logon or logoff. The check also helps avoid most last-write-wins conflicts. However, in some cases you might need to enable this setting to disable Portability archive hashing and force ProfileUnity to disregard the hash comparisons.
- Amazon S3 Storage Credential—Holds encrypted Amazon S3 storage credentials. To get encrypted credentials, scroll to the Cloud Storage Settings section of the Administration screen within the ProfileUnity Management Console. Click Copy to Clipboard next to the Amazon Client Credentials. This copies the encrypted credentials to the clipboard and then you can paste them here.
- Azure Credential—Holds encrypted Azure storage credentials. To get encrypted credentials, scroll to the Cloud Storage Settings section of the Administration screen within the ProfileUnity Management Console. Click Copy to Clipboard next to the Azure Client Credentials. This copies the encrypted credentials to the clipboard and then you can paste them here.
- Secondary Azure Credential—Holds encrypted secondary Azure storage credentials. To get encrypted credentials, scroll to the Cloud Storage Settings section of the Administration screen within the ProfileUnity Management Console. Click Copy to Clipboard next to the Azure Client Credentials. This copies the encrypted credentials to the clipboard and then you can paste them here.
- Google Storage Credential—Holds encrypted Google storage credentials. To get encrypted credentials, scroll to the Cloud Storage Settings section of the Administration screen within the ProfileUnity Management Console. Click Copy to Clipboard next to the Google Client Credentials. This copies the encrypted credentials to the clipboard and then you can paste them here.
- Secondary Paths—This setting allows administrators to specify both primary path prefix and secondary path prefixes for the storage of INI Configuration and ClientSettings and Creds files. This allows for failover protection should access to the primary location fail. Mixing UNC paths with cloud paths is allowed.
- Example 1:
s3://b1/f1 > s3://b2/f1, gs://b3/f1 - Example 2:
\\n1\f2 > \\n2\f2, \\n3\f2, gs://b5/f2
- Example 1:
- Double-click any of the policies to change the ADM policy setting.
- Select the Enabled radio button, then fill in any required parameters.
-
- Click the OK button to save your changes.
- Repeat the same steps with any remaining ADM policy settings.