FlexDisk is a robust VMware Virtual Machine Disk (VMDK) delivery system managed by ProfileUnity. ProfileUnity already provides application and data layering services while managing a user’s personal settings across Windows devices. However, our FlexDisk technology offers even better application performance while significantly reducing storage, network, and CPU overhead. FlexDisk allows administrators to provision flexible, user VMDKs on a VMware Virtual Machine File system (VMFS) high-speed data storage volume to deliver user profiles or applications. These VMDKs are shareable among hundreds of users, reducing application and data storage space requirements. At login, FlexDisk instantly connects applications and data directly to floating pool users and avoids slow network streaming of applications and data, because it is hot-added from the VMFS to virtual machines when provisioned by View resulting in faster logins and better performance.
How might you take advantage of Liquidware’s FlexDisk Technology? FlexDisk can be used to provide I/O steering, a follow-me user data disk, a follow-me user profile disk, and application layering. FlexDisk allows not only user applications to be on different VMDKs but also allows the OS to be separated from other user applications. Distributing the OS and applications across multiple VMFS volumes reduces the read IOPS on your base replica disk to get you more out of your storage. A follow-me user data disk is a read/write VMDK per user that follows the user from desktop to desktop. ProfileUnity will automatically detect the assignment of a user to a desktop and then hot-add their personal user data disk to that desktop. This follow-me disk allows for a location to store parts of the user profile, Outlook OST file, or even the My Documents folder on high-speed storage. In similar fashion, a follow-me user profile disk is where the user’s entire profile exists on a VMDK that follows them from desktop to desktop. In this case, ProfileUnity attaches a VMDK that contains the user profile which removes the need to move the user profile and instead requires only a pointer to it.
FlexDisk also allows for VMDKs to be used to deliver FlexApp application layers for high performance execution of applications to non-persistent or persistent VMware Horizon Desktops. Segmenting applications into different layers allows administrators to update application layers individually and push out layers to selective groups of users. Using this technique, each application layer is stored in its own VMDK and each user who is assigned to this application layer is given their individual write cache using a snapshot on the VMFS storage volume. Since the application is running from a VMDK on the same or similar storage as the VDI session, application performance will be very similar to an application baked into the base OS. With the application layer leveraging snapshots as the temporary write cache, it creates a fresh clean application layer each and every time. The applications can then be managed outside the base image and managed on a layer-by-layer basis.
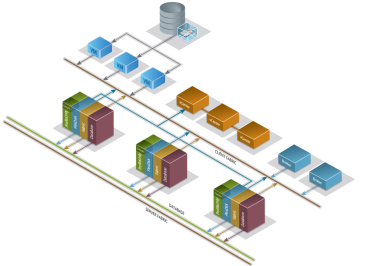
FlexDisk Architecture
When a user’s desktop depends on the delivery of a VMDK for the user’s profile or application layers, it is critical to have a highly scalable and highly available system that can protect against failure. FlexDisk isn’t just a single deliverable, but is a technology solution based on ProfileUnity Clustering where ProfileUnity is configured in a clustered mode to provide multiple nodes for scaling additional resources and to protect against a single point of failure. ProfileUnity Clustering is comprised of the following parts:
- Fabric (RabbitMQ)
- FlexDisk Service
- Connection Server Monitor (Broker Monitor)
- Database (MongoDB)
- ProfileUnity
Fabric (RabbitMQ)
The Fabric is a set of services used to get information from point A to point B without a single point of failure. The Fabric is used to transmit and receive login/logoff events so VMDKs can be added or removed from the desktop at the proper times. ProfileUnity is using RabbitMQ to serve as the Fabric. RabbitMQ is an efficient, highly scalable, open source messaging broker that enables applications to communicate with one another. RabbitMQ offers highly available messaging queues that can be replicated over several machines ensuring that all application messages are safe in the event of a hardware failure.
The Fabric helps FlexDisk avoid having mission critical actions going to a single IP that could fail or be overburdened with traffic. By using a messaging fabric, message data is replicated on many stateless nodes and multiple paths to get from point A to point B. In the event of a failure of any one node, the data can still continue to travel to point B via the other many stateless nodes and paths that are still available, creating a highly available and scalable system. Having many nodes ready to handle inbound data also creates a system that can scale when necessary, such as when many users are logging in simultaneously at the beginning of the workday. Whether you have a few hundred users or you have a few thousand users, the Fabric can dynamically adjust the number of nodes for scaling by adding or deleting nodes as necessary.
FlexDisk Service
The FlexDisk Service is the main service that is responsible for pulling needed information from the Fabric and handling all provisioning of VMDKs with VMware Virtual Center APIs. This includes creating VMDKs, formatting VMDKs, taking snapshots, and handling who gets which VMDK among other tasks. It’s able to do all of its management remotely leveraging VMware vCenter APIs behind the scenes. When a user logs into a desktop, a message is sent to the Fabric about the user and which desktop is logging in. Then one of the many FlexDisk services nodes processes the request and attaches the correct VMDK based on the administrator configuration.
Connection Server Monitor
This lightweight broker agent sits on each View Broker and sends information to the Fabric about which user has logged in and logged off a desktop. Then one of the FlexDisk services nodes picks up the request to either hot-add the VMDK for a login or remove the VMDK for a logoff event.
Database (MongoDB)
ProfileUnity and its FlexDisk technology share a highly scalable and highly available database called MongoDB. MongoDB is an open source document database that stores data in the form of documents or JSON objects. Because the related data is stored together in documents, queries are much faster than in traditional relational databases where data from multiple tables needs to be joined together. MongoDB also provides a platform where data is distributed over replicated servers, providing enhanced performance and high availability while allowing users to easily scale the database horizontally. This database can be configured with a replica set of three or more nodes for high availability. This is done automatically for you when you make ProfileUnity aware of new nodes. The goal is to provide a layer of abstraction by automating MongoDB clustering and management as well as removing the need to have a database administrator just to manage the database.
ProfileUnity
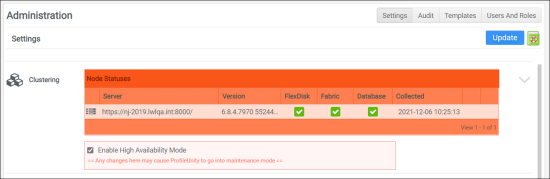
ProfileUnity provides automation of deployment, management and integration of FlexDisk into the ProfileUnity UI to allow the delivery of a user profile or application layers via VMDK to persistent and non-persistent desktops. ProfileUnity keeps track of the status of each node’s services in the Service Status Dashboard which can be found in the FlexDisk Integration section of the Administration screen within the ProfileUnity Management Console. The consolidation of all services in the FlexDisk, Fabric (RabbitMQ) and Database (MongoDB) stack ensures ease of use for deployment, configuration and management of clustering by providing a layer of abstraction between ProfileUnity and the use of VMware VMDKs, removing the requirement for a complex setup, network load balancers, or external database clusters.
Setting Up ProfileUnity Clustering for FlexDisk
When setting up the FlexDisk service using ProfileUnity Clustering, following the instructions in order is very important. Each step builds the foundation for the next step and ensures all the pieces are communicating with each other. Note you must start with a minimum of three nodes, and the total number of nodes should always be an odd number if you want to add more nodes.
Setting Up the Primary Node
- Install the ProfileUnity Management Console on the first server. This machine must meet the following requirements:
- Be running Windows Server 2012 R2, 2016, 2019, or 2022
- Have a static IP address
- Be joined to a domain
- Log in to the ProfileUnity Management Console.
- Hover over your username in the top right of the screen.
- In the drop-down menu that appears, click the Administration option.
- The Administration screen opens with the Settings tab displayed.
- Scroll down to the FlexDisk section.
- Click the Download Connection Server Monitor link.
- Install the Connection Server Monitor on all View Connection Brokers the users will be using to access pools. You will tell the Connection Server Monitor about this primary node installation of the ProfileUnity Management Console.
- Go back to the FlexDisk section of the Administration screen within the ProfileUnity Management Console and click the Add vCenter Credentials button.
- Enter your credentials formatted the same as they are in the Virtual Center Client.
Adding Additional Nodes for ProfileUnity Clustering
- Install the ProfileUnity Management Console on the second server. This machine must meet the following requirements:
- Be running Windows Server 2012 R2, 2016, 2019, or 2022.
- Have a static IP address
- Be joined to a domain
- Go back to the first installation of the ProfileUnity Management Console on the primary server and go to the Clustering section of the Settings tab on the Administration screen.
- Select the Enable High Availability Mode checkbox.
- Click the Update button in the top right corner of the screen.
-
Important: Changing Enable High Availability Mode and updating the settings will put ProfileUnity temporarily into Maintenance Mode. When done, ProfileUnity will redirect you to the login screen where you can log in and go back to the Settings tab of the Administration screen to complete the Clustering/FlexDisk configuration.
- After logging back in to the Management Console on the primary server, click your username in the top right corner of the screen.
- In the drop-down menu that appears, click the Administration option.
- The Administration screen opens with the Settings tab displayed.
- Scroll down to the Clustering section.
- Click the Add Node link which appears after updating the High Availability Mode setting.
- Enter the secondary node address and click the Add button. This address should be the fully qualified domain name of the server where the second installation of the ProfileUnity Management Console was installed appended with the default port of 8000. For example, the node address would look like:
prou2.mydomain.com:8000. - Confirm the addition of the second node to the service.
- Wait while the second node is added.
- Install the ProfileUnity Management Console on the third server. This machine must meet the following requirements:
- Be running Windows Server 2012 R2, 2016, 2019, or 2022
- Have a static IP address
- Be joined to a domain
- Go back to the first installation of the ProfileUnity Management Console on the primary server and go to the Clustering section of the Settings tab on the Administration screen.
- Click the Add Node link.
- Enter the node address for the third server in the cluster and click the Add button. This address should be the fully qualified domain name of the server where the third installation of the ProfileUnity Management Console was installed appended with the default port of
8000. For example, the node address would look like:prou3.mydomain.com:8000. - Confirm the addition of the third node to the service.
- Wait while this node is added.
- Repeat steps 8-17 to add additional nodes.
Important: While setting up the FlexDisk service requires at least 3 nodes, you can configure more nodes if you want. However, note that MongoDB requires that there be an odd number of nodes. So, for example, if you already have 3 nodes configured and need to add another, you must add 2 more, rather than just 1 more to end up with an odd number.
Support for Multiple vCenter Servers
ProfileUnity’s FlexDisk technology supports the use of multiple VMware vCenter Servers. For organizations that have users that float between multiple vCenter Servers, FlexDisk coordinates communication and executes administrative tasks using the vCenter APIs to attach and detach VMDKs based on each user’s requirements and the server to which they are currently attached.
To configure for multiple VMware vCenter Servers, complete the following steps:
- Log in to the ProfileUnity Management Console.
- Hover over your username in the top right corner of the screen.
- In the drop-down menu that appears, click the Administration option.
- The Administration screen opens with the Settings tab displayed.
- Scroll down to the FlexDisk section.
- Click the Add vCenter Credentials button.
- Enter your VMware Virtual Center credentials formatted the same as they are in the VMware vCenter Client.
Direct to Host Mode
In the process of delivering VMDK-based layers, the FlexDisk technology makes calls to use the VMware vCenter APIs which is extra piece of software taking up additional resources. By using the Direct to Host Mode, FlexDisk can bypass vCenter and go directly to the host to speed up the attachment of VMDK layers and reduce overhead.
Direct to Host Mode can be configured in the FlexDisk Integration section of the Administration screen after you enter your VMware vCenter Server credentials to add the server to the list of Virtual Centers for FlexDisk to use.
To configure Direct to Host mode, complete the following steps:
- Click the
 (Key) icon to the right of your Virtual Center Host name.
 - Enter the root credentials for this vCenter Server.
- Click Save.
Note that all ESXi hosts under this vCenter Server have to have the same root user and password as the server in order for FlexDisk to have direct access to each host on this server.
Using FlexDisk Across Multiple Data Centers with One Master Console
The ProfileUnity FlexDisk architecture allows for multiple installations of ProfileUnity across multiple data centers. One master ProfileUnity Management Console will drive all the consoles for the other data centers. This applies to features like clustering and high availability. All traffic within a particular site will stay within that site while there is one master site that controls all the secondary sites.
To configure nodes on multiple sites, complete the following steps:
- In the Clustering section of the Administration screen, select the Enable High Availability Mode checkbox if it is not already selected.
-
- Click the Update button in the top right corner of the screen.
-
Note: Changing Enable High Availability Mode and updating the settings will put ProfileUnity temporarily into Maintenance Mode. When done, ProfileUnity will redirect you to the login screen where you can log in and go back to the FlexDisk Integration section of the Administration screen to complete the FlexDisk configuration.
- With Enable High Availability Mode on, two links appear in the Clustering section: Add Node and Add Node to New Group.
-
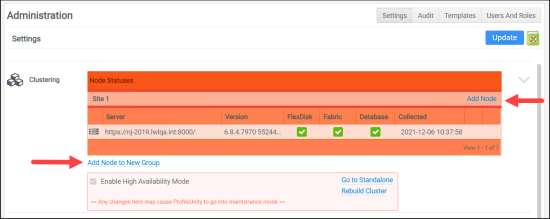
- To add a new site, click the Add Node to New Group link and enter the node address for another server located at another site and click the Add button. This address should be the fully qualified domain name of the server where the ProfileUnity Management Console was previously installed appended with the default port of 8000. For example, the node address would look like:
prou4.mydomain.com:8000. - To add a node to any site, click the Add Node link within the site’s Node Status list, enter the node address for another server, then click the Add button. This address should be the fully qualified domain name of the server where the ProfileUnity Management Console was previously installed appended with the default port of 8000. For example, the node address would look like:
prou4.mydomain.com:8000.