The ProfileUnity Management Console provides one central utility administrators can use to configure and manage how users interact with the different types of desktops in their environment. Upon installation, ProfileUnity creates a default admin user account. The username is “admin”, and you are asked to supply a password. Make note of this information to refer to it later as needed.
You can edit these settings and create additional console user accounts if you want to do so. Creating, modifying, and deleting user accounts is done through the Users And Roles tab of the Administration screen within the ProfileUnity Management Console. To get there, complete the following steps:
- Hover over your username in the top right corner of the Management Console screen.
- In the drop-down menu that appears, click the Administration option.
- The Administration screen opens with the Settings tab displayed.
- Click the Users And Roles tab in the top right corner of the screen.
Configuring Authentication Settings
Authentication Mode
ProfileUnity offers two ways to authenticate users: Basic or Domain. Basic authentication uses ProfileUnity’s local authentication process. Domain authentication allows users to authenticate using Active Directory during a ProfileUnity Management Console logon. This feature allows existing directory credentials to be used with ProfileUnity and prevents users from having to maintain an additional password.
Any change to the Authentication Mode requires a service restart.
Valid Active Directory Groups for Login
Allows users to enter Active Directory groups that are allowed to log in to ProfileUnity. To do this, enter the name of the group and click Add. To delete a group, click the Remove button next to its name.
Creating a New User Account
To add a new console user, complete the following steps:
- Click the Add User button in the User Management field.
- Select the Link to Active Directory checkbox to authenticate users with LDAP.
- In the Name field, enter the username the user will use to log in to ProfileUnity.
- Enter the New Password the user will use to log in to ProfileUnity. This field is not used if Link to Active Directory is selected. A valid password must be at least 8 characters long and include at least one character from three of the following categories:
- Uppercase letters
- Lowercase letters
- Numbers
- Non-alphanumeric characters
- Re-enter your password in the Confirm Password field. This field is not used if Link to Active Directory is selected.
- Select an Account Type:
- Administrators
- Users
- (Optional) Select the Disable User checkbox if you want to prevent the user from logging in to the ProfileUnity Management Console.
- Click Save to save all your changes before leaving the User Editor. All unsaved changes will be discarded.
Note: If Link to Active Directory is selected, this username must map to an entry in the LDAP directory server for authentication to succeed.
Editing User Account Settings
To edit a console user’s settings, click the ![]() (Edit) icon next to the user’s account name in the User Management list.
(Edit) icon next to the user’s account name in the User Management list.
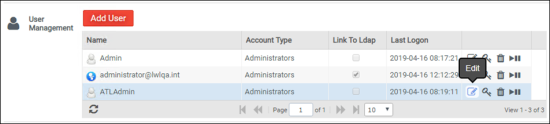
To edit user account settings, complete the following steps:
- Click the
 (Edit) icon in the user's row.
 - (Optional) On the popup screen that appears, select the Link to Active Directory checkbox to authenticate users with LDAP.
- (Optional) Enter a different Name that the user will use to log in to ProfileUnity.
-
Note: If the Link to Active Directory checkbox is selected, the username must map to an entry in the LDAP directory server in order for authentication to succeed.
- (Optional) Select a different Account Type:
- Administrators
- Users
- (Optional) Select the Disable User checkbox if you want to prevent the user from logging in to the ProfileUnity Management Console.
- Click Save.
Resetting User Account Passwords
To reset an existing console user’s password at any time, click the Change Password icon next to the user’s account name.
You will be asked to enter a new password and to confirm the password by re-entering it. A valid password must be at least 8 characters long and include at least one character from three of the following categories:
-
Uppercase letters
-
Lowercase letters
-
Numbers
-
Non-alphanumeric characters
Deleting User Accounts
To remove an old or unused user account from the User Management screen, click the Delete icon next to the name of the user, then confirm that you want to proceed with the deletion. Note that after the user account is deleted, it cannot be recovered.
Disabling or Enabling User Accounts
Disabling active user accounts can be done in two ways. You can either choose to edit the user account and select the Disable User checkbox on the edit screen, or you can click the ![]() (Enable/Disable) icon in the User Management list next to the name of the user whose account you want to disable.
(Enable/Disable) icon in the User Management list next to the name of the user whose account you want to disable.
To reactivate inactive user accounts, click the Enable or Disable button in the User Management list next to the name of the user whose account you want to enable again.
-
Disable Toggle—Account is Enabled. Click the dark gray icon to disable the user account.
-
Enable Toggle—Account is Disabled. Click the grayed-out icon to enable the user account.
Role Management
Role management allows users to assign specific Management Console editing permissions for each Active Directory user account. This feature makes it possible to have leveled roles within a help desk team. For example, a level-one role might allow changes to drive mapping, printer, and shortcut settings but not have permission to change filters, portability, or FlexDisk settings. By default, only local admin users can make edits in the ProfileUnity Management Console. All other AD users can view the current settings but are unable to make edits until roles are assigned. Roles open up access to grant granular editing permissions within the ProfileUnity Management Console. However, ProfileUnity cannot grant or override server user account permissions.
Users do not have to be Active Directory Administrators in order to be assigned roles, but their accounts need to be able to query AD and write to one or more deployment paths.
Designating a Service Account
One Active Directory account must be designated as the account that will deploy the configuration file and make queries to outside resources like AD, file shares and print shares. This account will need full control of the deployment path. Users do not need any access to the deployment path when a service account is set up. Enter the username and password for this account. Then click the Add/Update button.
Creating a New Role
To create a new role, complete the following steps:
- Click the Add Role button.
- For the General section, type the Name of the role.
- Assign a Priority to the new role. If conflicting roles are created, the priority with the lower number takes precedence.
- (Optional) Add a Description in the related field.
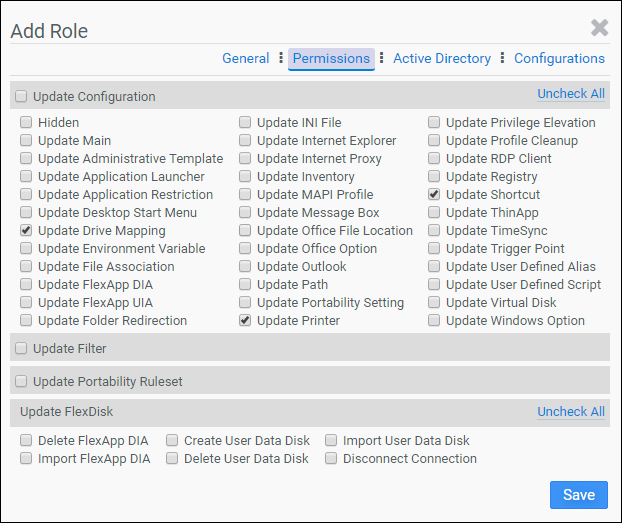
- Click the Permissions tab.
- Select all permissions that you want to grant to the new role.
-
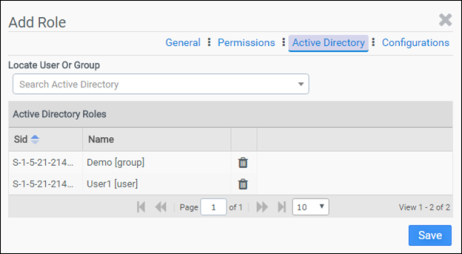
- Click the Active Directory tab.
- In the Locate User Or Group field, start typing the name of the user or group to be assigned to this role. After you type the first three letters, ProfileUnity displays users and groups whose names contain those letters. Add users and/or groups to this list.
-
- Click the Configurations tab.
- In the Locate Configuration field, enter the name of the ProfileUnity Configuration where this role will apply.
- (Optional) Add more configurations. if you want.
- Click Save.
Editing a Role
To edit a role, click the ![]() (Edit) icon to the right of the role name in the Role Management list. Make the necessary changes to each section, as you did when creating a new role.
(Edit) icon to the right of the role name in the Role Management list. Make the necessary changes to each section, as you did when creating a new role.
Deleting a Role
To delete a role, click the ![]() (Delete) icon to the right of the role name in the Role Management list.
(Delete) icon to the right of the role name in the Role Management list.