The first step in delivering additional applications that are outside of the base image to select users inside your environment is to package the application by running its installer and capturing any initial settings.
Important: After capturing every FlexApp package, it is best practice to revert the virtual machine to the initial snapshot. This ensures that any testing is done with a clean system and that further packages are not affected by leftover settings and software from previous packages.
To create a new application package, complete the following steps:
- In the FlexApp Packaging Console, click the Create button.
- On the Create a Package screen, enter a Package Name.
- (Optional) In the Package Version field, enter the version number for the package you are creating. This field is displayed in addition to the Package Name in the FlexApp Packaging Console list and in the ProfileUnity Management Console to provide better tracking and version control.
- (Optional) In the Package Description field, enter a description of the package or other notes for future reference.
- (Optional) In the Installer Location field, enter the full path of the application’s setup program. Any additional parameters for the installation program can be entered on the blank line immediately below the Installer Location field.
- In the Package Type field, select the type of disk on which the package will be created: FlexDisk, Cloud, or VHDX (Local Disk Type is for troubleshooting purposes only).
Note: One of the most powerful features of ProfileUnity is the filters that can be leveraged during the assignment of FlexApp Layers. Note that filters apply only to VHDX and cloud FlexApp packages. VMDK-based FlexApp layers currently support user, group, and basic machine assignments. The primary reason for the difference in VHDX vs. VDMK package types centers on architecture. The ProfileUnity Configuration INI-based workflow does not apply to the VMDK-based assignments controlled by vCenter.
- The fields that appear below the Package Type field change depending on which package type you selected:
- If you chose FlexDisk, do the following:
- In the Size field, enter the maximum size of the virtual disk in gigabytes.
- Choose the datastore to hold the FlexApp package from the FlexDisk Datastore field.
- In the Disk Type drop-down list, choose whether the disk will be Expandable or Fixed in size.
- If you chose Cloud, then do the following:
- Select the proper Cloud Credentials which are configured in the ProfileUnity Management Console Administration > Cloud Storage section.
- Select the Cloud Storage Location that pairs with your selected Cloud Credentials. Valid cloud storage path prefixes are as follows:
S3://for Amazon S3AZ://for Azure BlobGS://for Google Cloud Storage
- (Optional)Select the Create FlexApp One checkbox if you want to create a FlexApp One application for this FlexApp package you are creating.
- Choose the Capture Mode to use when capturing system changes. Options are Normal (Legacy) or High Compatibility (default).
- In the Size field, enter the maximum size of the virtual disk in gigabytes.
- Select the Compression checkbox to allow space savings.
- In the Disk Type drop-down list, choose whether the disk will be Expandable or Fixed in size.
- If you chose VHDX, do the following:
- Enter the path in the VHDX Location field that appears.
- (Optional) Select the Create FlexApp One checkbox if you want to create a FlexApp One application for this FlexApp package you are creating.
- Choose the Capture Mode to use when capturing system changes. Options are Normal (Legacy) or High Compatibility (default).
- In the Size field, enter the maximum size of the virtual disk in gigabytes.
- Select the Compression checkbox to allow space savings.
- In the Disk Type drop-down list, choose whether the disk will be Expandable or Fixed in size.
- If you chose Local Disk, then enter the path in the Local Installation Location field (i.e. C:\TEMP).
Note: This option is for troubleshooting purposes only and should not be used for normal capture operations.
- If you chose FlexDisk, do the following:
- Click Create to begin preparing for application capture.
- When ready, click the Start button. If specified, the application installer will be launched. Follow any instructions in the application’s installer. If the application installed was left blank, navigate to and execute the installer manually. While the installer is running, FlexApp is recording the entire installation process and saving it to the package.
- (Optional) After the application installation is complete, if the installer requires a reboot, say No / Reboot Later and then use the Reboot button. After rebooting, the FlexApp Packaging Console automatically re-opens, allowing you to complete the packaging process.
- Click Finish to stop the capture of the entire installation sequence.
- After the process finishes, you can click one of the following buttons:
- Delete—Click if the installation failed or you do not want to keep the newly created package.
- Extend—Click if you have another application to capture and package with the one that just finished. This is used primarily when applications are dependent upon other applications being installed in order to run properly.
- Cache Blocks—Click if you want to use the Predictive Block Caching feature. After the packaging process is complete, click the Cache Blocks button to record the specific blocks that are needed when opening the application. Open the application and close it so that the FlexApp Packaging Console can record the first cached blocks needed. If the application has many shortcuts, open all the shortcuts to record as many blocks as possible to reduce application load time for the users.
- Configure—Click if you have other package settings you want to configure.
- Save—Click to save the newly created FlexApp Package.
- The application package then appears in the FlexApp Packaging Console Inventory list.
-
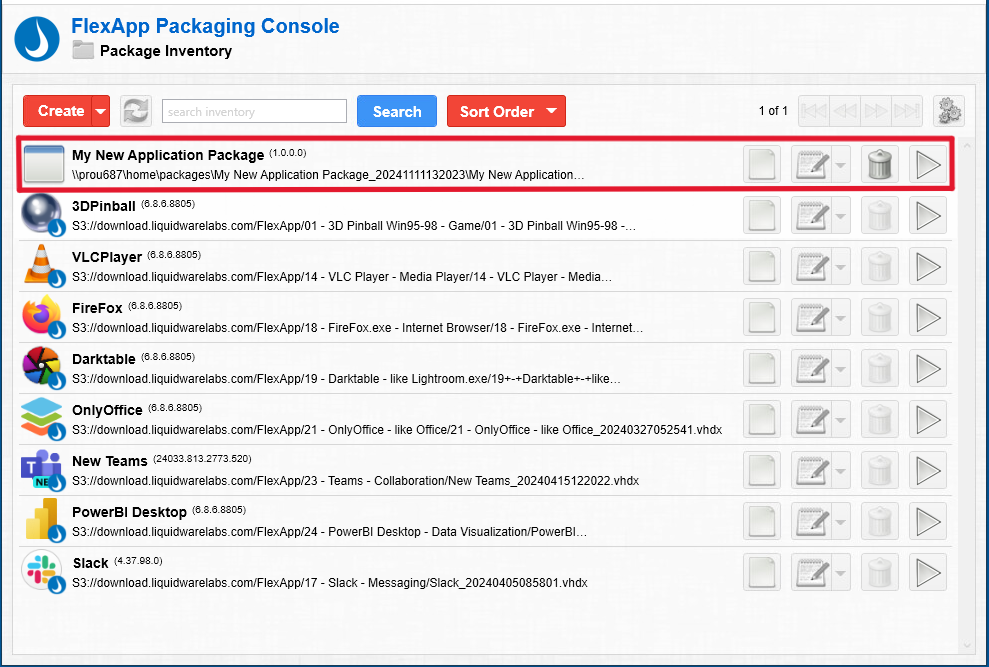
- Because the app you just created is not a Liquidware app, the
 (Liquidware Drop) icon does not appear in the bottom right corner of the app icon. Unlike Liquidware apps, which cannot be deleted, you can delete the new app at any time by clicking the Trash Can icon in its row.