The Administration screen allows you to control various settings and operations for ProfileUnity in your environment. To get to these settings, complete the following steps:
- Hover over your username in the top right corner of the Management Console screen.
- In the drop-down menu that appears, click the Administration option.
- The Administration screen opens with the Settings tab displayed.
- The Settings tab contains fields that allow you to configure the following settings:
-
Note: Authentication settings are available on the Access and Authentication tab, not the Settings tab.
Audit
Enable Audit
Check the Track Changes to Configurations, Filters, Portability Rulesets And Other Items option in order for ProfileUnity to keep an audit trail of revisions to your database.
How Many Days of Records to Keep
If enabling audit tracking, enter the number of days to retain audit information. The default is 120 days.
Cloud Storage
ProfileUnity supports the use of cloud storage for configuration INI files and user profiles.
To make use of cloud storage spaces, click the Add Cloud Credentials button.
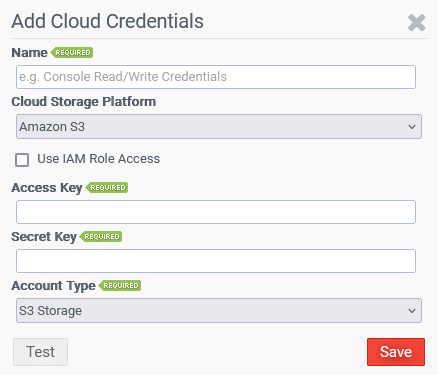
Name
Enter your descriptive name for this cloud storage connection. You will need at least two sets of credentials per cloud storage platform – one for the ProfileUnity Console functions and one for the ProfileUnity Client functions.
Cloud Storage Platform
Select the cloud storage provider from Amazon S3, Microsoft Azure, or Google Cloud Platform. You will be asked to configure additional storage settings based on which of the following platforms you choose:
Amazon S3
- Without IAM Roles Access Checkbox Selected:
- Access Key: Enter your user access key for this cloud storage connection.
- Secret Key: Enter the secret key for this cloud storage connection.
- Account Type: Choose from storage types including S3 Storage, S3 GovCloud Storage (US East), S3 GovCloud Storage (US West), and S3 Custom Storage. If S3 Custom Storage is chosen, enter the URL of your Amazon S3 custom region. For example:
https://s3-compatible.domain.local:9000
- With IAM Roles Access Checkbox Selected:
- When you select this checkbox, the Access Key and Secret Key fields are grayed out. This feature allows the customer to build-out an IAM Role that allows any device in their Amazon environment and VPC to automatically be approved to communicate with the S3 bucket without credentials.
Note: The IAM Role could be applied to the entire VPC (not recommend) or select areas, such as the ProU Console and FPC (i.e., both virtual machines within Amazon), which would allow both machines to access S3 without credentials because the IAM role gets applied to the ec2 instances when being created. IAM roles can also be applied to Workspaces instances and AppStream fleets.
Note: For more information related to Amazon S3, see Example IAM policy for role-based S3 access, Using an IAM role to grant permissions to applications running on Amazon EC2 instances, and Store Application Icon, Setup Script, Session Script, and VHD in an S3 Bucket.
Microsoft Azure
- Account Name: Enter your Azure Blob cloud storage account.
- Account Key: Enter the secret key for this cloud storage account.
- Storage Domain: Choose from storage types including Azure, Azure US Government, Azure Germany, and Custom Storage.
If Custom Storage is chosen, enter the URL of your Azure Blob storage endpoint. For example:https://AccountName.blob.core.windows.net
Google Cloud Platform
- Google Application Credential Key: Copy and paste the contents of the Google Application Credentials JSON file.
To confirm the information provided is accurate for any of the cloud platforms referenced above, provide a storage path to connect to and click the Test button to ensure successful authentication
Global Variables
Administrators can use global variables across all objects in the Management Console. This is a time-saving feature that allows global changes to occur by changing the value of a variable in one location and having that change automatically propagated to all configurations, filters, and portability rulesets that use that variable.
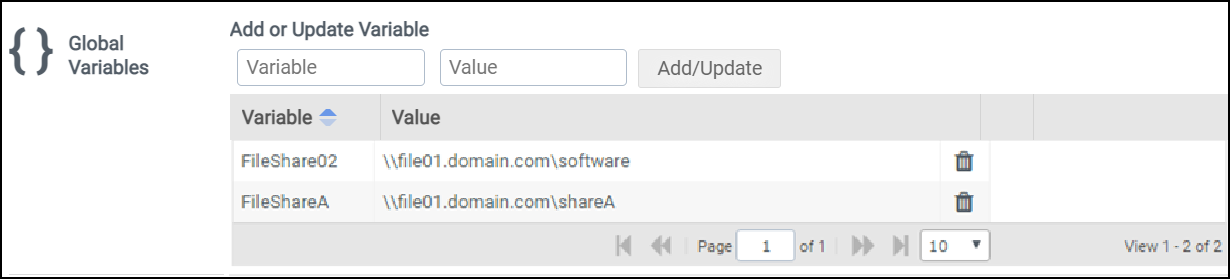
To set up global variables for use in your environment, enter a Variable Name and a Value. Then click Add/Update to either add a new variable or update an existing value.
Note: Variable names can only contain letters and numbers. Other characters are not permitted.
To use a global variable in a Configuration, Filter, or Portability Ruleset, type in the variable name surrounded by curly brackets. For example, to use a global variable named FileShare02, type in {FileShare02}.
Important: Anytime you make a change to a configuration, including global variables that might affect multiple configurations, you must re-download or re-deploy the related Configuration INI files. In addition, those changes will not take effect until the next logon event from the user. If they are currently logged in when the configuration file is downloaded, they will still be under the old configuration settings.
Path Overrides
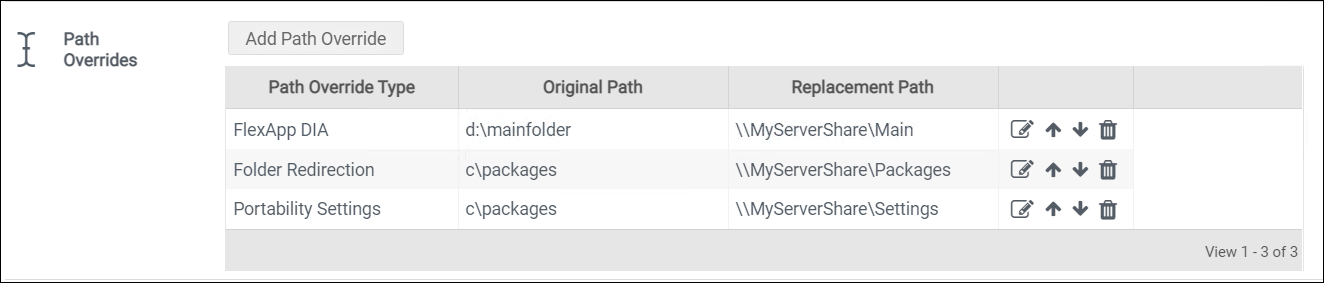
The Path Overrides section allows you to find and replace paths for Folder Redirection, Portability and FlexApp in the generated INI file.
The path override list that appears in the section can be re-ordered at any time by clicking the ![]() (Up) and
(Up) and ![]() (Down) arrows in the path override rows. Override paths that are higher in the list take precedence over paths that are lower.
(Down) arrows in the path override rows. Override paths that are higher in the list take precedence over paths that are lower.
After an override path is created, you can edit or delete it by clicking the corresponding icon in the override path row.
Client Settings
The Client Settings section handles client-side settings for requesting licensing, ProfileDisk VHDX configurations, and FlexDisk configurations.
ProfileDisk allows a user’s entire Windows user profile to exist on a virtual disk that can be attached and detached to a desktop as needed. The ProfileDisk stores 100% of all file system and registry changes in the user profile path so that all user settings and data are preserved on both persistent and non-persistent desktops. VHDX-based ProfileDisks are managed in this section. VMDK-based ProfileDisks are managed by FlexDisk.
ProfileDisk and FlexDisk VMDK Mode
Select the mode that determines whether client machines will use VHDX-based or VMDK-based ProfileDisks and FlexApp Packages:
-
Disable ProfileDisk and FlexDisk VMDK – Select this option if you will not be using ProfileDisk and FlexDisk features. This hides ProfileDisk management in the Client Settings section.
-
VHDX ProfileDisk – Select this option if using VHDX-based ProfileDisks only.
-
FlexDisk VMDK ProfileDisk and FlexApp – Select this option to allow use of VMDK-based ProfileDisks and FlexApp packages.
-
FlexDisk VMDK FlexApp Only – Select this option if using VMDK-based FlexApp packages only.
Add ProfileDisk Group Button
Note: This button does not appear if the ProfileDisk and FlexDisk VMDK Mode field is set to Disable ProfileDisk and FlexDisk VMDK.
Click this button to assign one or more VHDX ProfileDisks to Active Directory User Groups.
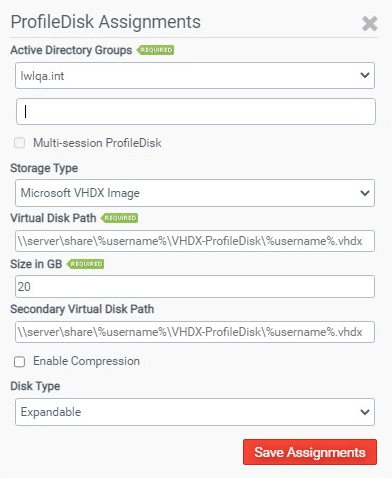
Select your Domain and enter Active Directory Groups that will be assigned this ProfileDisk.
Check the Multi-session ProfileDisk option to allow users to log in to multiple sessions at the same time and have the same experience across sessions. Multi-session ProfileDisks require the use of VHDX disks and, as a result, are only supported on Windows 10, Windows 11, and Windows Server 2016, 2019, 2022, and 2025.
Note: Microsoft does not support putting Outlook OST files (cached mode) or OneDrive repositories on multi-session disks.
Choose the Storage Type, Virtual Disk Path, Size in GB, Secondary Virtual Disk Path, and whether the disk will be Expandable or Fixed in size. Check the Enable Compression option to allow space savings. Different VHDX ProfileDisks can be assigned to particular Active Directory User Groups. Also, each group of users can have separate paths to their own ProfileDisk so that loads can be balanced among different file shares.
ProfileDisk Assignments
Lists the VHDX-based ProfileDisks in your environment by user assignment and disk location. You can edit or remove ProfileDisks from this list. ProfileDisk assignment settings are included when Configurations are downloaded as PDF or TXT files.
Any changes made to ProfileDisk Assignments requires an updated clientsettings.xml file be deployed and processed by the ProfileUnity Client Tools Startup Script GPO, also known as startup.exe.
Manage Connection Strings
This holds strings to connect the Management Console to the License Service and FlexDisk Service.
Deploying Client Settings
To deploy Client Settings, complete the following steps:
- In Deployment Path, enter the deployment location where the client configuration will be stored on your NETLOGON share.
- Check the Overwrite files if they exist option to have the deployed configuration file overwrite any previously existing client configuration files at the specified location.
- Click the Update button in the top right corner of the screen.
- Click the Download or Deploy Client Settings button.
- On the screen that pops up, select the Platform for deployment.
- If you choose the Domain or Cloud option, this will place the client configuration file, nodes.xml, in the directory you specified for the Deployment Path.
- If you choose the Download option, the client configuration file will be downloaded through your browser for you to extract the contents to your Deployment Path manually.
ProfileUnity Tools
In addition to the ProfileUnity Management Console, there are two other main components to ProfileUnity: the FlexApp Packaging Console and the Client. The FlexApp Packaging Console allows administrators to capture application installations for assigning to users and groups as FlexApp layers. The Client manages each user’s settings and persona during their session and processes context-aware filters and FlexApp assignments.
Run Client Tools As Service
To run the Client tools as a service, complete the following steps:
- In the Run Client Tools As Service field of the ProfileUnity section, enter a username in the form of domain\username. This service account will be used to run the ProfileUnity Client Service. For a local computer account, use .\username. If the specified local account does not exist, it will be created without administrative privileges.
- Enter the password.
- To deploy the service configuration to a specified Deployment Path, complete the following steps:
- In the Run Client Tools As Service field of the ProfileUnity section, click the Download or Deploy Service Configuration button.
- In order for this to work, you also need the system INI path set in the GPO and the license path set to the main deployment path.
- On the popup screen that appears, select the Platform you want to use for deployment.
- If you choose the Domain or Cloud option, the service configuration file is placed in the directory you specify in the Deployment Path field on the popup screen.
- If you choose the Download option, the service configuration file is downloaded through your browser for you to extract the contents to your Deployment Path manually.
- Click the Deploy button.
To delete a service configuration file from the specified Deployment Path, click the Remove Service Configuration button.
Deploying Client Tools
To deploy Client Tools, complete the following steps:
- In the Deployment Path field of the ProfileUnity Tools section, enter the UNC or cloud storage path to where the client tools and configuration files should be placed.
- Select the Overwrite files if they exist checkbox to overwrite files if they already exist at the specified location. Otherwise, an error will be thrown if the files already exist.
- Click the Update button in the top right corner of the screen.
- Click the Download or Deploy Client Tools button to deploy the client tools to the deployment path.
- On the popup screen that appears, select the Platform you want to use for deployment.
- If you choose the Domain option, the service configuration file is placed in the directory you specify in the Deployment Path field on the popup screen.
- If you choose the Download option, the service configuration file is downloaded through your browser for you to extract the contents to your Deployment Path manually.
- Click the Deploy button.
Download FlexApp Packaging Console
Downloads the FlexApp Packaging Console Installer to a location you specify.
Download Runtime Installation Tool
Downloads the Runtime Installation tool to a location you specify.
Download Standalone ProfileUnity License Server
Downloads the standalone ProfileUnity License Server installer to a location you specify. A Standalone ProfileUnity License Server can be deployed within a DMZ and serve license requests to remote and internet-based clients. The only requirement is that the Standalone License Service must be able to communicate with the MongoDB database on all cluster nodes, if clustered.
Service Logs
Level of Logging
The level of logging ProfileUnity should log at. Choose from Debug, Info, Warning, Error, or Fatal.Debug provides the most detailed information.
Logging Path
The path to where ProfileUnity should log.
View ProfileUnity Console Log
View the latest log being reported.
Download Logs
Downloads a ZIP file containing all of ProfileUnity’s relevant log files. If the current node is part of a cluster, all logs from all cluster nodes will also be included in the ZIP.
Proxy
(Optional) Enable proxy support for cloud platforms and other calls via the internet by clicking on Proxy Settings.
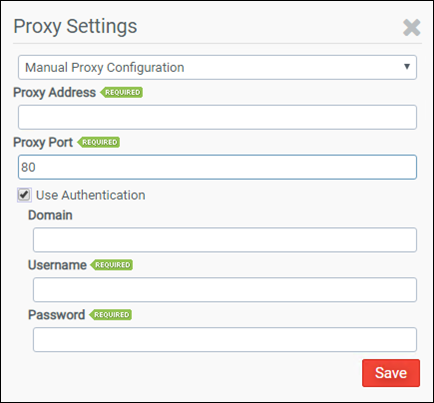
Choose from the following options:
- Do not use Proxy
- Auto-detect Proxy
- Manual Proxy Configuration
If you choose the Manual Proxy Configuration option, you can use the rest of the fields.
Proxy Address
Enter the IP Address of the proxy server.
Proxy Port
Enter the port to use for communication with the proxy server. The default is port 80.
Use Authentication
Check this option to provide proxy authentication credentials if they are required and then complete the Domain, Username, and Password information.
-
Domain (Optional) — Enter the domain for the user account information entered below.
-
Username — Enter the username for the account to be used for authentication with the proxy server.
-
Password — Enter the password for the account to be used for authentication with the proxy server.
Miscellaneous
Hide Profile Cleanup Module
Select this checkbox to hide the Profile Cleanup module on the Configuration Module Edit screen. If you select this option, you will need to click the Update button and then either log out or refresh the screen to see the changes.
Hide FlexDisk
Select this checkbox to hide the FlexDisk Management view. If you select this option, you will need to click the Update button and then either log out or refresh the screen to see the changes.
Hide Liquidware App Catalog
Select this checkbox to hide the catalog of Liquidware Cloud Apps from the FlexApp Inventory inside both the Management Console and the FlexApp Packaging Console. Liquidware Cloud Apps are FlexApp packages that have been created by Liquidware and are immediately available for use in your environment. They are provided via cloud storage. Since the original packages were created and are owned by Liquidware, these FlexApps are subject to be updated, changed, or removed at any time. Therefore, it is recommended that these FlexApps be cloned before using in your own environment.
Active Directory Search Maximum Result Size
The maximum number of results to return when searching Active Directory. For example: When creating filters or ProfileDisk assignments.
Hide External Links
Hides external web links from the Management Console.
Enable Secure Banner Text
Check this option to enable the display of all secure banner text. If you select this option, you will need to click the Update button and then either log out or refresh the screen to see the changes.
Secure Banner Text
Type the approved secure text that is displayed before a secure mode login.
Secure Login Banner Text
Type the approved secure login text to be shown prior to, or as part of, the ProfileUnity Management Console login process.
WebServices
Port
The port on which the web service runs. The default is 8000. Any change to the port number requires a service restart.
Session Timeout in Minutes
How long before an idle user has before they will be required to log in again.
Configuration Lock Idle Timeout in Minutes
The amount of time a user can be idle while editing a configuration before the lock will expire, at which time any changes will be lost and other users will be allowed to edit the configuration.
SSL Certificate
Displays current SSL certificate.
Import New Certificate
Allows the user to import a .PFX certificate.
Database
Click the Manage Database Connection button to configure the location of your ProfileUnity database.
Connection String
The connection string used to connect to the database.
Note: You can use the Connection String to switch between databases by just changing the file name if you have multiple databases that you would like to maintain separately.
You are encouraged to back up your configuration on a regular basis. To create a copy of your database, click the Backup Databases button. A list of backups will be kept below the button. Use the Download icon to download a specific database backup.
You can also restore your configuration settings from a previously made backup. This is especially useful if you are upgrading your software version and would like to keep your existing configuration settings. To restore an archived database, click the Restore Databases button and browse to the location of the backed-up database file.
Inventory
Database Purging
Check Automatically purge old inventory records if you want ProfileUnity to periodically check for old records that can be deleted.
Enter how long you want to keep inventory records in days in the How Many Days of Records to Keep field. ProfileUnity will automatically purge records outside of this date range if automatic purges have been enabled. The default is 30.
Configuration Revision Retention
As part of the configuration auto-deployment feature, ProfileUnity has a built-in retention policy. Anytime that a Configuration file is updated, it will be saved. Set the retention number to indicate the last number of updates to each Configuration that ProfileUnity will keep. The default is 5. You can view the list of saved changes by clicking on the Configuration History icon to the right of each Configuration name on the Configuration Management screen.
Clustering
Clustering is part of the FlexDisk technology solution where ProfileUnity is configured in a clustered mode to provide multiple nodes for scaling additional resources and to protect against a single point of failure. Clustering settings go hand-in-hand with FlexDisk settings. Clustering also protects license requests from having a single point of failure because any node can respond to the request.
Node Status
Shows the statuses of all ProfileUnity Console Node Services that are known to this console.
Enable High Availability Mode
In order to create a new ProfileUnity Cluster, you must first enable High Availability Mode on a node. To enable High Availability mode, complete the following steps:
- Select the High Availability Mode checkbox.
- Click the Update button in the top right corner of the screen.
- Wait for ProfileUnity to switch into HA mode.
- A message pops up and you are then redirected to the Management Console login screen.
- Log in to the Management Console again.
- Hover over your username in the top right corner of the screen.
- In the drop-down menu that appears, click the Administration option.
- The Administration screen opens with the Settings tab displayed.
- Scroll down to the Clustering section.
- Click the Add Node link in the top right corner of the Node box and enter another node address. This address should be the fully qualified domain name of another server where an additional installation of the ProfileUnity Management Console was installed, appended with the default port of 8000. For example, the node address would look like: prou2.mydomain.com:8000.
- Repeat the process to add more nodes.
Note: The total number of nodes in the cluster must be an ODD NUMBER. We recommend 3 nodes, but 5 or 7 are supported as well. Generally, more than 3 is not necessary. The number of nodes that can go down and have the cluster still operating normally depends on the total number of nodes in the cluster. Normal operation requires at least 2 nodes to be up at all times. So, a 3 node cluster would allow for a single node failure, a 5 node cluster would allow for a 3-nodes failure, and so on. Using two nodes is not a valid cluster configuration and will NOT result in the ability to lose a node and still function normally.
FlexDisk
FlexDisk is a robust VMware VMDK (Virtual Machine Disk) delivery system managed by ProfileUnity. FlexDisk allows administrators to provision flexible, user VMDKs on a VMware Virtual Machine File system (VMFS) high-speed data storage volume to deliver user profiles or applications. FlexDisk settings go hand in hand with Clustering settings.
FlexDisk Port
Enter the number of the port used to communicate with the FlexDisk API. The default is 4443.
Add vCenter Credentials
Click this button to enter your VMware Virtual Center credentials for FlexDisk to use. Enter your credentials formatted the same as they are in the Virtual Center Client. The FlexDisk technology supports the usage of multiple VMware vCenter Servers. For organizations that have users that float between multiple vCenter Servers, FlexDisk coordinates communication and executes administrative tasks using the vCenter APIs to attach and detach VMDKs based on each user’s requirements and the server to which they are currently attached.
Virtual Centers
Lists the VMware vCenter Servers that FlexDisk has access to. You can edit or remove servers from this list.
Add Horizon Credentials
Click this button to add VMware Horizon credentials for FlexDisk to use. FlexDisk can use VMware Horizon to allow pool-based VMDK ProfileDisk and FlexApp assignments. This also enables real-time attachment of VMDK-based FlexApp packages to all assigned users without waiting for their next logon via the Attach App Now link within the Lightning Bolt menu of the FlexDisk Management > FlexApp screen.
Horizon Credentials Field
Lists the VMware Horizon machines that FlexDisk has access to. You can edit or remove servers from this list.
AVD App Attach
Azure Tenant Name
The tenant name for the credentials entered via Administration > Access and Authentication > Directory Services.
Subscription Id
The subscription id to use when syncing flexapp packages with app attach packages.
Resource Group Name
The resource group name to use when syncing flexapp packages with app attach packages.
Host Pool Name
The optional host pool name to use when syncing flexapp packages with app attach packages. If provided, and an update is being performed, then any existing host pool assignments will be overwritten.
Location
The location to use when syncing flexapp packages with app attach packages.
License Reporting
How Many Days of Records to Keep
Enter the number of days to retain user license information. The default is 120 days.
Notifications
Enable Notifications
Check this option to enable email notifications from ProfileUnity.
Subject Prefix
Enter the prefix that will be placed on the subject line of all ProfileUnity email notifications.
SMTP Host
Enter the address of the SMTP server that will send the emails.
SMTP Port
Enter the port number for the SMTP server to use for communication.
Authentication
Enter the Username and Password that will be used for authentication purposes when using the SMTP server. The Enable SSL/TLS option is available to encrypt transmissions when sending emails.
Sender Name
Enter the name that the email will be “From” when it is delivered.
Sender Email
Enter the email address that the email will be “From” when it is delivered.
Send Test Email
Allows you to test your email notification settings by sending a test email from within ProfileUnity to an email address that you specify. Click the Update button in the top right corner of the screen to save any setting changes before sending a test email.
Manage Notifications
Manage a list of users who will receive notification emails. ProfileUnity uses this list to email users about node outages when using the FlexDisk technology. Separate multiple emails in this list with a semi-colon.
Reporting
Application Report
Select the checkbox to enable Application Report caching and timed updates for configuration and Active Directory data under Report Management. This will setup an automated 24-hour timer to refresh Active Directory data.
Note: Running reporting without caching is not recommended for large AD structures because it will increase the per-query run time.
License Servers
View a list of license servers connected to the Management Console.