ProfileUnity with FlexApp is enabled by the administrator for select users or groups within the ProfileUnity Management Console. Admins package applications that are provisioned on a virtual disk to run separately from the OS and local session. When users log in, these FlexApp applications appear beside their golden image applications.
Note: One of the most powerful features of ProfileUnity is the filters that can be leveraged during the assignment of FlexApp packages. Note that filters apply only to cloud and VHDX FlexApp packages. VMDK-based FlexApp layers currently support user, group, and basic machine assignments. The primary reason for the difference in VHDX vs. VDMK package types centers on architecture. The ProfileUnity Configuration INI-based workflow does not apply to the VMDK-based assignments controlled by vCenter. For more information, refer to the FlexApp Using VHDXs vs VMDKs guide.
Setting up VMDK-based Application Delivery
To use VMDKs for application delivery, complete the following steps:
- Log in to the ProfileUnity Management Console.
- Hover over your username in the top right corner of the screen.
- In the drop-down menu that appears, click the Administration option.
-
Note: If you selected VMware as your broker, you must set up the FlexDisk service if you have not already done so. Follow the directions provided earlier in the Setting Up ProfileUnity Clustering for FlexDisk section.
- The Administration screen opens with the Settings tab displayed.
- Scroll down to the Client Settings section.
- Set ProfileDisk and FlexDisk VMDK Mode to FlexDisk VMDK FlexApp Only.
- Set the Deployment Path to your NETLOGON path.
- Click the Update button in the top right corner of the Management Console screen.
- Click the Download or Deploy Client Settings button to send a copy of the client configuration file to the specified location.
- On the screen that pops up, select the Platform for deployment.
- If you choose the Domain or Cloud option, this places the client configuration file in the directory you specified for the Deployment Path.
- If you are not logged in as an Active Directory user, choose the Download option. This allows you to place the client configuration file, clientsettings.xml, in the Deployment Path manually.
- Click the Deploy button.
- Scroll down to the ProfileUnity Tools section and click Download or Deploy Client Tools to copy the ProfileUnity Client files to the NETLOGON share on your domain controller.
- Click the Configuration Management option in the left column.
- Reboot or refresh all user desktops.
Note: In order for the FlexDisk VMDK FlexApp mode change to take effect, end-user machines must re-process the updated clientsettings.xml file via the Startup Script GPO, also known as startup.exe.
- Next, install the FlexApp Packaging Console in a separate location.
Installing the FlexApp Packaging Console and Packaging Applications
The FlexApp Packaging Console allows administrators to configure and prepare any applications that will need to be captured and deployed to users. This software can be downloaded from the ProfileUnity Management Console and installed on a separate machine for packing applications. For more information on installing and using the FlexApp Packaging Console, refer to the ProfileUnity FlexApp Packaging Console Guide.
When using the FlexApp Packaging Console to create VMDK-based application packages, select FlexDisk as the Package Type and choose which FlexDisk datastore to which the package will be saved.
Assigning VMDK-Based FlexApp Layers to Users, Groups, or Computers
After applications have been packaged using the FlexApp Packaging Console, the ProfileUnity Management Console enables admins to set which applications are assigned to which users, user groups or computers. Computer-level assignments allow for pattern-based machine name matching to cover a pool of machines rather than a single machine. VMDK-based FlexApp packages can be used with or without ProfileUnity as a Service. If ProfileUnity as a Service is used, FlexApp packages are played back on service boot making them available before the user logs in. If ProfileUnity as a Service is not used, playback of the FlexApp packages occurs at user login.
- Click the FlexDisk Management option in the left column.
-
-
Note: Beginning with version 6.8.5, FlexDisk Management is hidden by default. If you do not see it in the left column, hover the cursor over your username in the top right corner of the screen and click the Administration option. In the Settings tab, scroll down to and click to open the Miscellaneous section. Deselect the Hide FlexDisk checkbox, then click Update in the top right corner of the screen. Lastly, refresh your screen and the FlexDisk Management option should appear in the left column.
-
- The FlexDisk Management screen opens with the FlexApp tab displayed.
- Click the
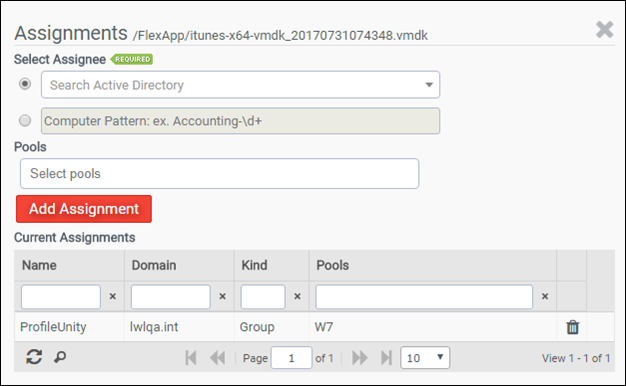
 (Assignments) button for each FlexApp VMDK that needs to be assigned to users.
 - Either search Active Directory to select a user or group from the list for user assignments or enter a machine name pattern for computer-level assignments. If you have VMware Horizon and have configured your Horizon service account credentials in Administration, FlexDisk section, you will get the option to limit the application to the user, group, computer and/or the pool. Click the Add Assignment button to add it to the list of current assignments.
-
- Click the X icon to close the screen.
Viewing VMDK-Based FlexApp Packages in the Management Console
To see your FlexDisk packages, click the FlexDisk Management option in the left column. All VMDK-based packages appear in the FlexApp tab on the screen.
In addition, you can view them within the Inventory Management screen.
-
-
Note: Beginning with version 6.8.5, FlexDisk Management is hidden by default. If you do not see it in the left column, hover the cursor over your username in the top right corner of the screen and click the Administration option. In the Settings tab, scroll down to and click to open the Miscellaneous section. Deselect the Hide FlexDisk checkbox, then click Update in the top right corner of the screen. Lastly, refresh your screen and the FlexDisk Management option should appear in the left column.
-