ProfileUnity with FlexApp is enabled by the administrator for select users or groups within the ProfileUnity Management Console. Admins package applications that are provisioned on a virtual disk to run separately from the OS and local session. When users log in, these FlexApp applications appear alongside their golden image applications.
Note: One of the most powerful features of ProfileUnity is the filters that can be leveraged during the assignment of FlexApp Layers. Note that filters apply only to cloud and VHDX FlexApp packages. VMDK-based FlexApp layers currently support user, group, and basic machine assignments. The primary reason for the difference in VHDX vs. VDMK package types centers on architecture. The ProfileUnity Configuration INI-based workflow does not apply to the VMDK-based assignments controlled by vCenter. For more information, refer to the FlexApp Using VHDXs vs VMDKs guide.
Installing the FlexApp Packaging Console & Packaging Applications
The FlexApp Packaging Console allows administrators to configure and prepare any applications that will need to be captured and deployed to users. This software can be downloaded from the ProfileUnity Management Console and installed on a separate machine for packing applications. For more information on installing and using the FlexApp Packaging Console, refer to the ProfileUnity FlexApp Packaging Console Guide.
Deploying Cloud or VHDX FlexApp Packages in the Management Console
After applications have been packaged using the FlexApp Packaging Console, the ProfileUnity Management Console enables admins to set which applications are assigned to which users or user groups.
To deploy cloud and VHDX FlexApp packages for users in the Management Console, complete the following steps:
- Log in to the ProfileUnity Management Console.
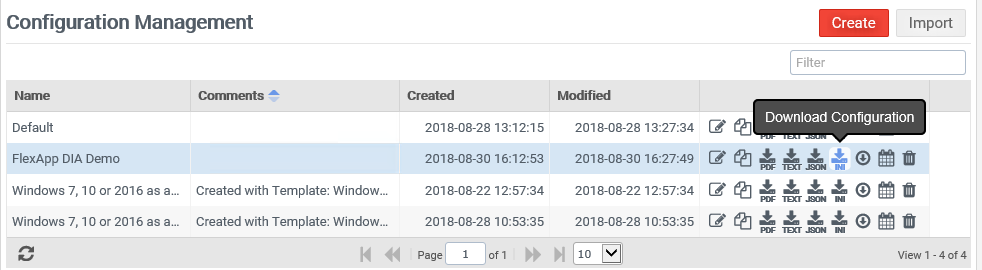
- Click the Configuration Management option in the left column.
- Either create a new configuration or choose the configuration you want to edit and click the Edit icon to the right of the configuration name.
- On the Edit Configuration screen, click the FlexApp icon.
- Click the Add FlexApp Rule button.
- Because you provided the URL of the ProfileUnity Management Console when logging in to the FlexApp Packaging Console, the two consoles are now connected. All of the application packages created by the FlexApp Packaging Console thus appear in the ProfileUnity Management Console’s FlexApp library and are available for deployment.
- (Optional) On the New FlexApp Setting screen, select a Filter for this configuration element to apply this FlexApp rule to specific users or groups.
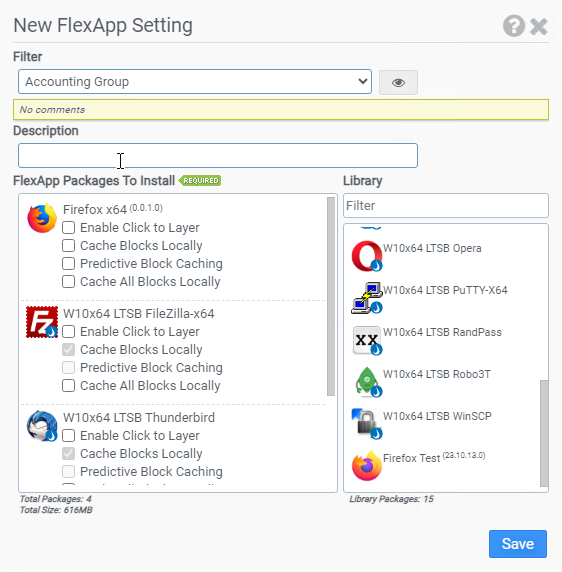
- Click and drag applications listed in the Library column on the right to the FlexApp Packages To Install column on the left. These packages will be layered in when the user logs in to their session.
- (Optional) Select the Enable Click to Layer checkbox if you want to delay the layering of this application from at user login to upon user request, which is after the user clicks the application icon on the desktop.
- (Optional) Select the Cache Blocks Locally checkbox if you want FlexApp Packages to be configured to replay using a cached mode on user desktops. This is particularly helpful with inconsistent network connections, SMB shares behind firewalls, and routers that have many hops. In cached mode, ProfileUnity requests blocks of the FlexApp package and stores them locally so that the next time the block is referenced, it is read from local storage. Cache Blocks Locally is enabled by default for FlexApps on cloud storage and is optional for FlexApps on SMB storage.
- (Optional) Select the Predictive Block Caching checkbox if you want to download and cache a specific set of blocks from a FlexApp VHDX file. This option requires the set of blocks to be recorded by the FlexApp Packaging Console while loading the application. Selecting Predictive Block Caching will also select Cache Blocks Locally automatically. Blocks downloaded utilizing this option are subject to the Bandwidth Throttling Target setting in the Main module.
- (Optional) Select the Cache All Blocks Locally checkbox if you want the entire FlexApp package to be downloaded in the background, enabling support for using the application even while offline. Blocks downloaded utilizing this option are subject to the Bandwidth Throttling Target setting in the Main module. Selecting Cache All Blocks Locally will also select Cache Blocks Locally automatically.
- Click Save.
- Click the Update button in the top right corner of the Edit Configuration screen to update the configuration with the FlexApp changes.
- To activate your changes for any subsequent user logins, remember to download or deploy a new INI file after you have made all changes to your configuration. You can download the configuration by clicking the Configuration Management option in the left column and then clicking the Deploy Configuration button for the application.
-
Viewing Cloud and VHDX FlexApp Packages in the Management Console
To view cloud and VHDX FlexApp packages in the Management Console, click the Inventory Management option in the left column.
The Inventory Management screen opens with the FlexApp tab displayed. All applications that have been packaged and created to be used by FlexApp appear in the list on the screen.