This module allows you to configure RDP clients from a centralized location. This module supports RDP versions 5.1 and higher.
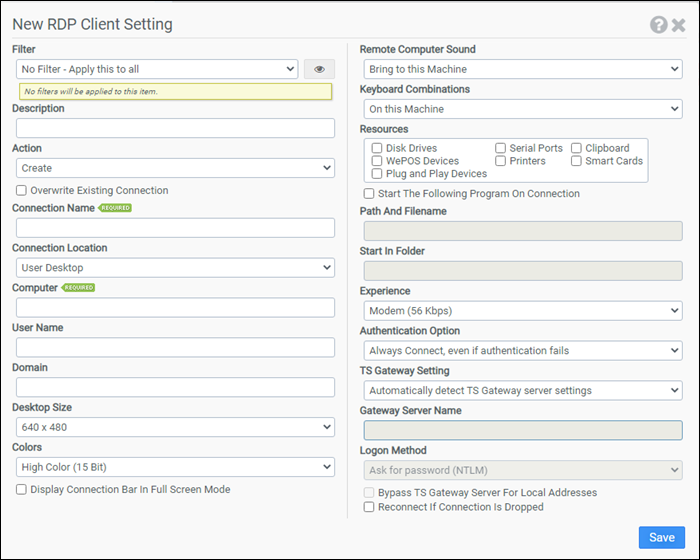
Filter
Select the name of the filter you want assigned to this configuration element. Click the Show Filter Details button on the right to review any filter settings without leaving Configuration Management.
Description
Enter a description for this rule.
Action
Select one of the following actions:
- Create: Creates a new RDP connection.
- Delete: Deletes an existing RDP connection.
Note: If a client machine has more than one version of the RDP client installed, precedence is given to the newest version. For example, if a client machine has both RDP 4.0 and RDP 5.2 installed, connections will be created and deleted for the RDP 5.2 version.
Overwrite Existing Connection
When this option is selected, existing RDP connections will be overwritten. This option is only available if Create is selected as the Action.
Connection Name
Enter the name of the RDP connection you want to create or delete. Subfolders can be specified by entering the relative path followed by the RDP connection name. Surrounding quotes are automatically added to the name.
Connection Location
Select the location where the RDP connection should be created or deleted. Choose from:
- User Desktop
- User Favorites
- User Start Menu
- User Programs Group
- User Startup Group
- User Send To
- User Quick Launch Bar
Computer
Enter the name of the computer you want the RDP client to connect to. This option is only available if Create is selected as the Action.
User Name
Enter the username the RDP client should use when connecting to the server. This option is only available if Create is selected as the Action.
Domain
Enter the domain name the RDP client should use when connecting to the server. This option is only available if Create is selected as the Action.
Desktop Size
Select the desktop size the RDP client should use. When the 80% of Screen choice is selected, the RDP desktop size is derived from the client resolution as shown in the table below. This option is only available if Create is selected as the Action.
| Client Resolution | RDP Desktop Size |
|---|---|
| 640 x 480 | 640 x 480 |
| 800 x 600 | 640 x 480 |
| 1024 x 768 | 800 x 600 |
| 1280 x 1024 | 1024 x 768 |
| 1600 x 1200 | 1280 x 1024 |
| Full Screen | Based on Client |
Colors
Select the color depth you want the RDP client to use. This option applies to RDP version 5.1 and newer and is only available if Create is selected as the Action. Choose from:
- High Color (15 bit)
- High Color (16 bit)
- True Color (24 bit)
- Highest Color (32 bit)
Display Connection Bar In Full Screen Mode
When this option is selected, the connection bar will be displayed across the top of the display when the RDP connection is in full screen mode. This option applies to RDP version 5.1 and newer and is only available if Create is selected as the Action.
Remote Computer Sound
Select how you want the RDP client to handle sound. This option applies to RDP version 5.1 and newer and is only available if Create is selected as the Action. Choose from:
- Bring to this Machine
- Do Not Play
- Leave at Remote Machine
Keyboard Combinations
Select how you want the RDP client to handle keyboard combinations such as ALT+TAB. This option applies to RDP version 5.1 and newer and is only available if Create is selected as the Action. Choose from:
- On this Machine
- On Remote Machine
- Only in Full Screen Mode
Resources
This option controls the resources that are available to the RDP client. This option applies to RDP version 5.1 and newer and is only available if Create is selected as the Action. Additionally, Clipboard, Plug and Play Devices, and WePOS Devices only apply to RDP version 6.0 and newer.
Start the Following Program on Connection
Selecting this option instructs the RDP client to start a program on connection. This option is only available if Create is selected as the Action.
Path and Filename
Enter the full path and filename of the program the RDP client should execute when connecting to the server. This option is only available if Start the Following Program on Connection is selected and Create is selected as the Action.
Start in Folder
Enter the full path of the folder the RDP client should start in when executing a program on connection to the server. This option is only available if Start the Following Program on Connection is selected and Create is selected as the Action.
Experience
Select the connection speed you want the RDP client to be optimized for. For RDP version 4.0 and 5.0, selecting Modem (28.8 Kbps) or Modem (56 Kbps) enables the Low-Speed Connection option in the RDP client. This option is only available if Create is selected as the Action. Choose from:
- Modem (56 Kbps)
- Low-speed broadband (256 Kbps – 2 Mbps)
- Satellite (2 Mbps – 16 Mbps with high latency)
- High-speed broadband (2 Mbps – 10 Mbps)
- WAN (10 Mbps or higher with high latency)
- LAN (10Mbps or higher)
- Detect connection quality automatically
Authentication Option
Select the server authentication level you want the RDP client to use. This option applies to RDP version 6.0 and newer and is only available if Create is selected as the Action. Choose from:
- Always Connect, even if authentication fails
- Do not connect if authentication fails
- Warn me if authentication fails
TS Gateway Setting
Select the gateway setting you want the RDP client to use. This option applies to RDP version 6.0 and newer and is only available if Create is selected as the Action. Choose from:
- Automatically detect TS Gateway server settings
- Use these TS Gateway server settings
- Do not use a TS Gateway server
Gateway Server Name
Enter the server name of the TS Gateway Server you want the RDP client to use. This option applies to RDP version 6.0 and newer and is only available if Use these TS Gateway server settings is selected and Create is selected as the Action.
Logon Method
Select the logon method you want the RDP client to use. This option applies to RDP version 6.0 and newer and is only available if Use these TS Gateway server settings is selected and Create is selected as the Action. Choose from:
- Ask for password (NTLM)
- SmartCard
- Allow me to select later
Bypass TS Gateway server for local addresses
Selecting this option instructs the RDP client to bypass the TS Gateway server when the destination is local. This option applies to RDP version 6.0 and newer and is only available if Use these TS Gateway server settings is selected and Create is selected as the Action.
Reconnect if Connection is Dropped
Selecting this option instructs the RDP client to attempt to automatically reconnect if the connection is dropped. This option applies to RDP version 5.2 and is only available if Create is selected as the Action.
Example 1
This example deletes the RDP connection named Solomon located in the Accounting folder in the User Start Menu.
- Filter: No Filter – Apply this to all
- Action: Delete
- Connection Name: Accounting\Solomon
- Connection Location: User Start Menu
Example 2
Example 2 creates an RDP connection named Abra Suite. The connection will be created in the User Start Menu in a subfolder named Human Resources. If the connection already exists, it will not be overwritten. This example leverages the macro @USERID. When ProfileUnity executes, the @USERID macro is expanded into the user's logon name. Therefore, the created RDP connection will connect to server ATLHR, use the user's logon name as the username, use domain name MyDomain, use Full Screen for the desktop size, and use High Color (16 Bit) color depth. Remote Computer Sound will be brought to the local computer. Keyboard Combinations will stay on the local computer. The RDP connection will start C:\Program Files\Best Software\Abra Suite\Programs\Abra32.exe and start in the C:\Program Files\Best Software\Abra Suite\Programs folder when double clicked. This connection will be optimized for a Broadband (128 Kbps - 1.5 Mbps) network and the connection will automatically reconnect if dropped.
- Filter: No Filter – Apply this to all
- Action: Create
- Overwrite Existing Connection: Not selected
- Connection Name: Human Resources\Abra Suite
- Connection Location: User Start Menu
- Computer: ATLHR
- User Name: @userid
- Domain: MyDomain
- Desktop Size: Full Screen
- Colors: High Color (16 Bit)
- Display connection bar in full screen mode: Not selected
- Remote Computer Sound: Bring to this Computer
- Keyboard Combinations: On the Local Computer
- Automatically Connect Disk Drives: Not selected
- Automatically Connect Printers: Not selected
- Automatically Connect Serial Ports: Not selected
- Automatically Connect Smart Cards: Not selected
- Start the Following Program on Connection: Selected
- Path and Filename: C:\Program Files\Best Software\Abra Suite\Programs\Abra32.exe
- Start in Folder: C:\Program Files\Best Software\Abra Suite\Programs
- Experience: Broadband (128 Kbps - 1.5 Mbps)
- Authentication Option: Always connect, even if authentication fails
- TS Gateway Setting: Automatically detect TS Gateway server settings
- Reconnect if Connection is Dropped: Selected